TREZOR – WALLET REVIEW & USER GUIDE
Trezor is a convenient and compact hardware wallet with an easy-to-use interface for several of the most popular crypto assets
Trezor provides a good balance between useability and advanced features that helps the beginner crypto investor store their private keys securely. In terms of value, Trezor is listed at $138 USD (€89 + €22 shipping) and is an ideal solution for beginner and novice users interested in the supported crypto assets.
Features
- Web-based wallet application
- Built-in display for confirmations
- PIN code access control
- Universal 2 factor device (FIDO U2F)
TREZOR REVIEW
Pros
- Compact design in a simple, well-built package
- Easy-to-use web application with advanced options as needed
- Very good documentation and help materials
Cons
- Limited crypto asset support
- No native application for Ether (ETH) or ERC20 tokens (supported through integration with MyEtherWallet)
- Cable needed to connect (otherwise portable device)
* This link directs you to Amazon as it provides the most options for purchasing this wallet. However, it is important to note that when purchasing a hardware wallet through a third party retailer or vendor to always ensure that the wallet once received has not been tampered with as this could compromise its security and thus the cryptocurrency you will store on it. Each wallet manufacturer typically has tamper resistant packaging or other hardware/software mechanisms to prevent tampering but they are not foolproof. Please only purchase hardware wallets from trusted vendors.
BUILD QUALITY & DURABILITY
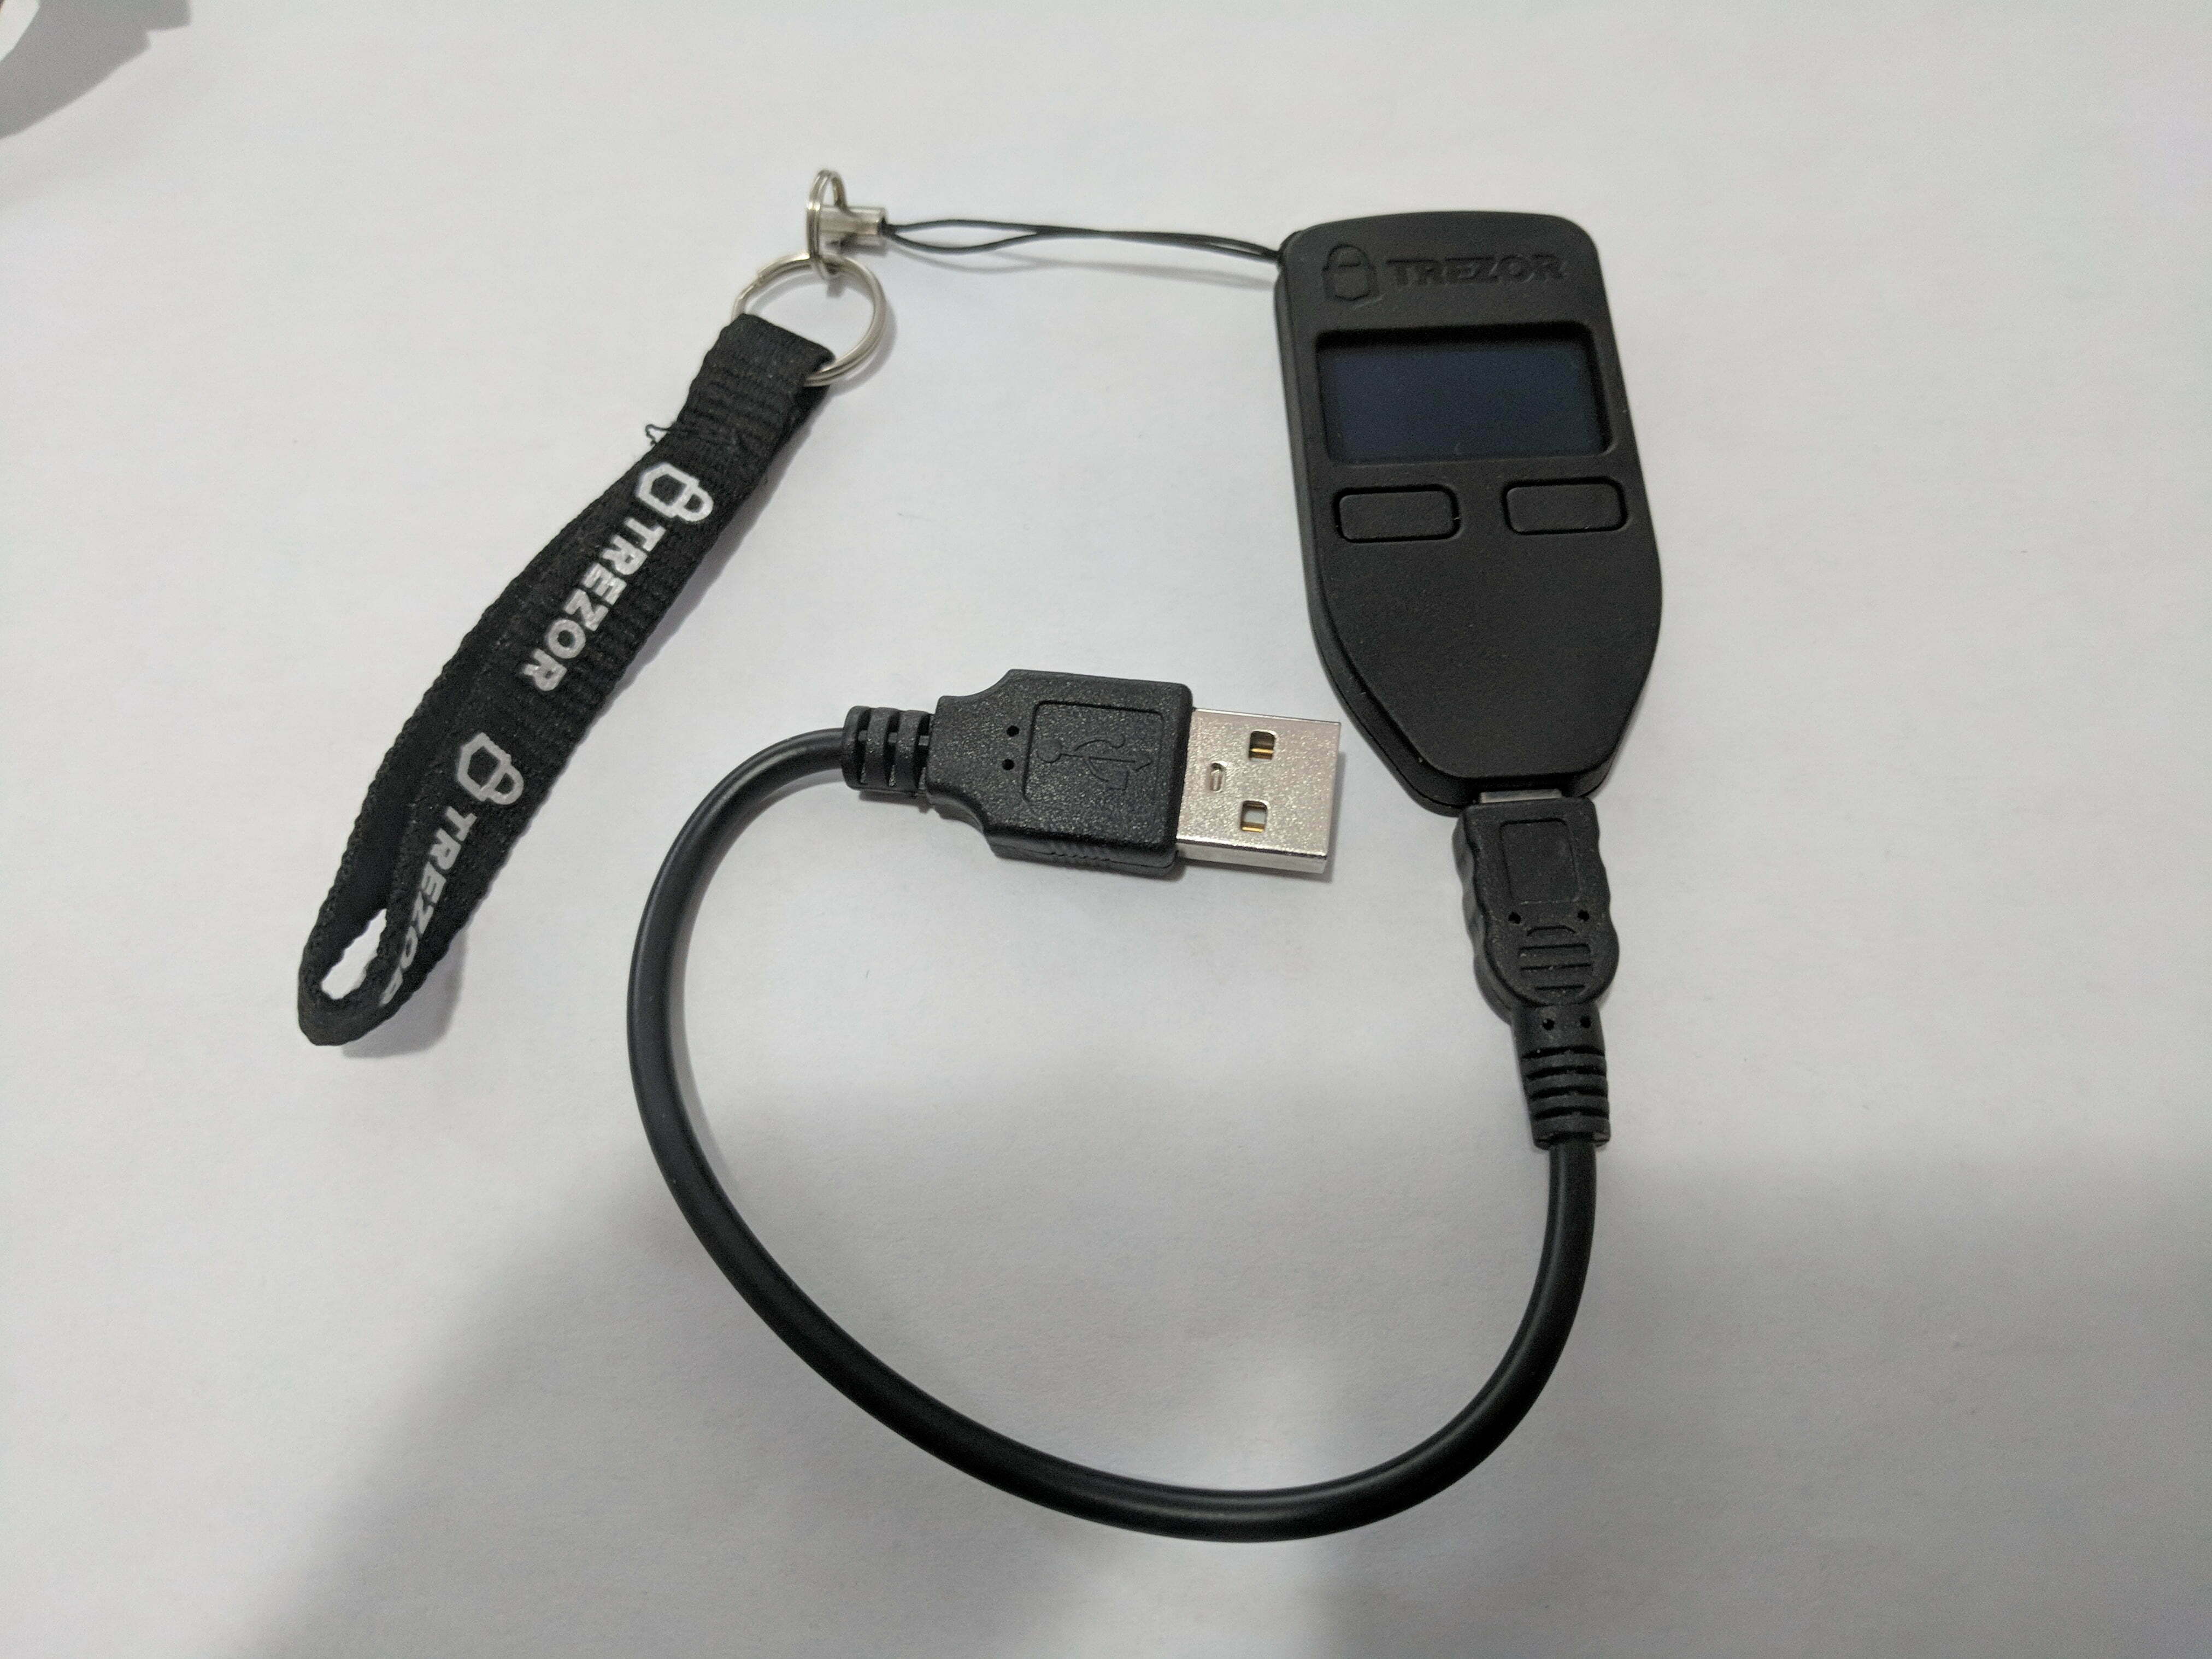
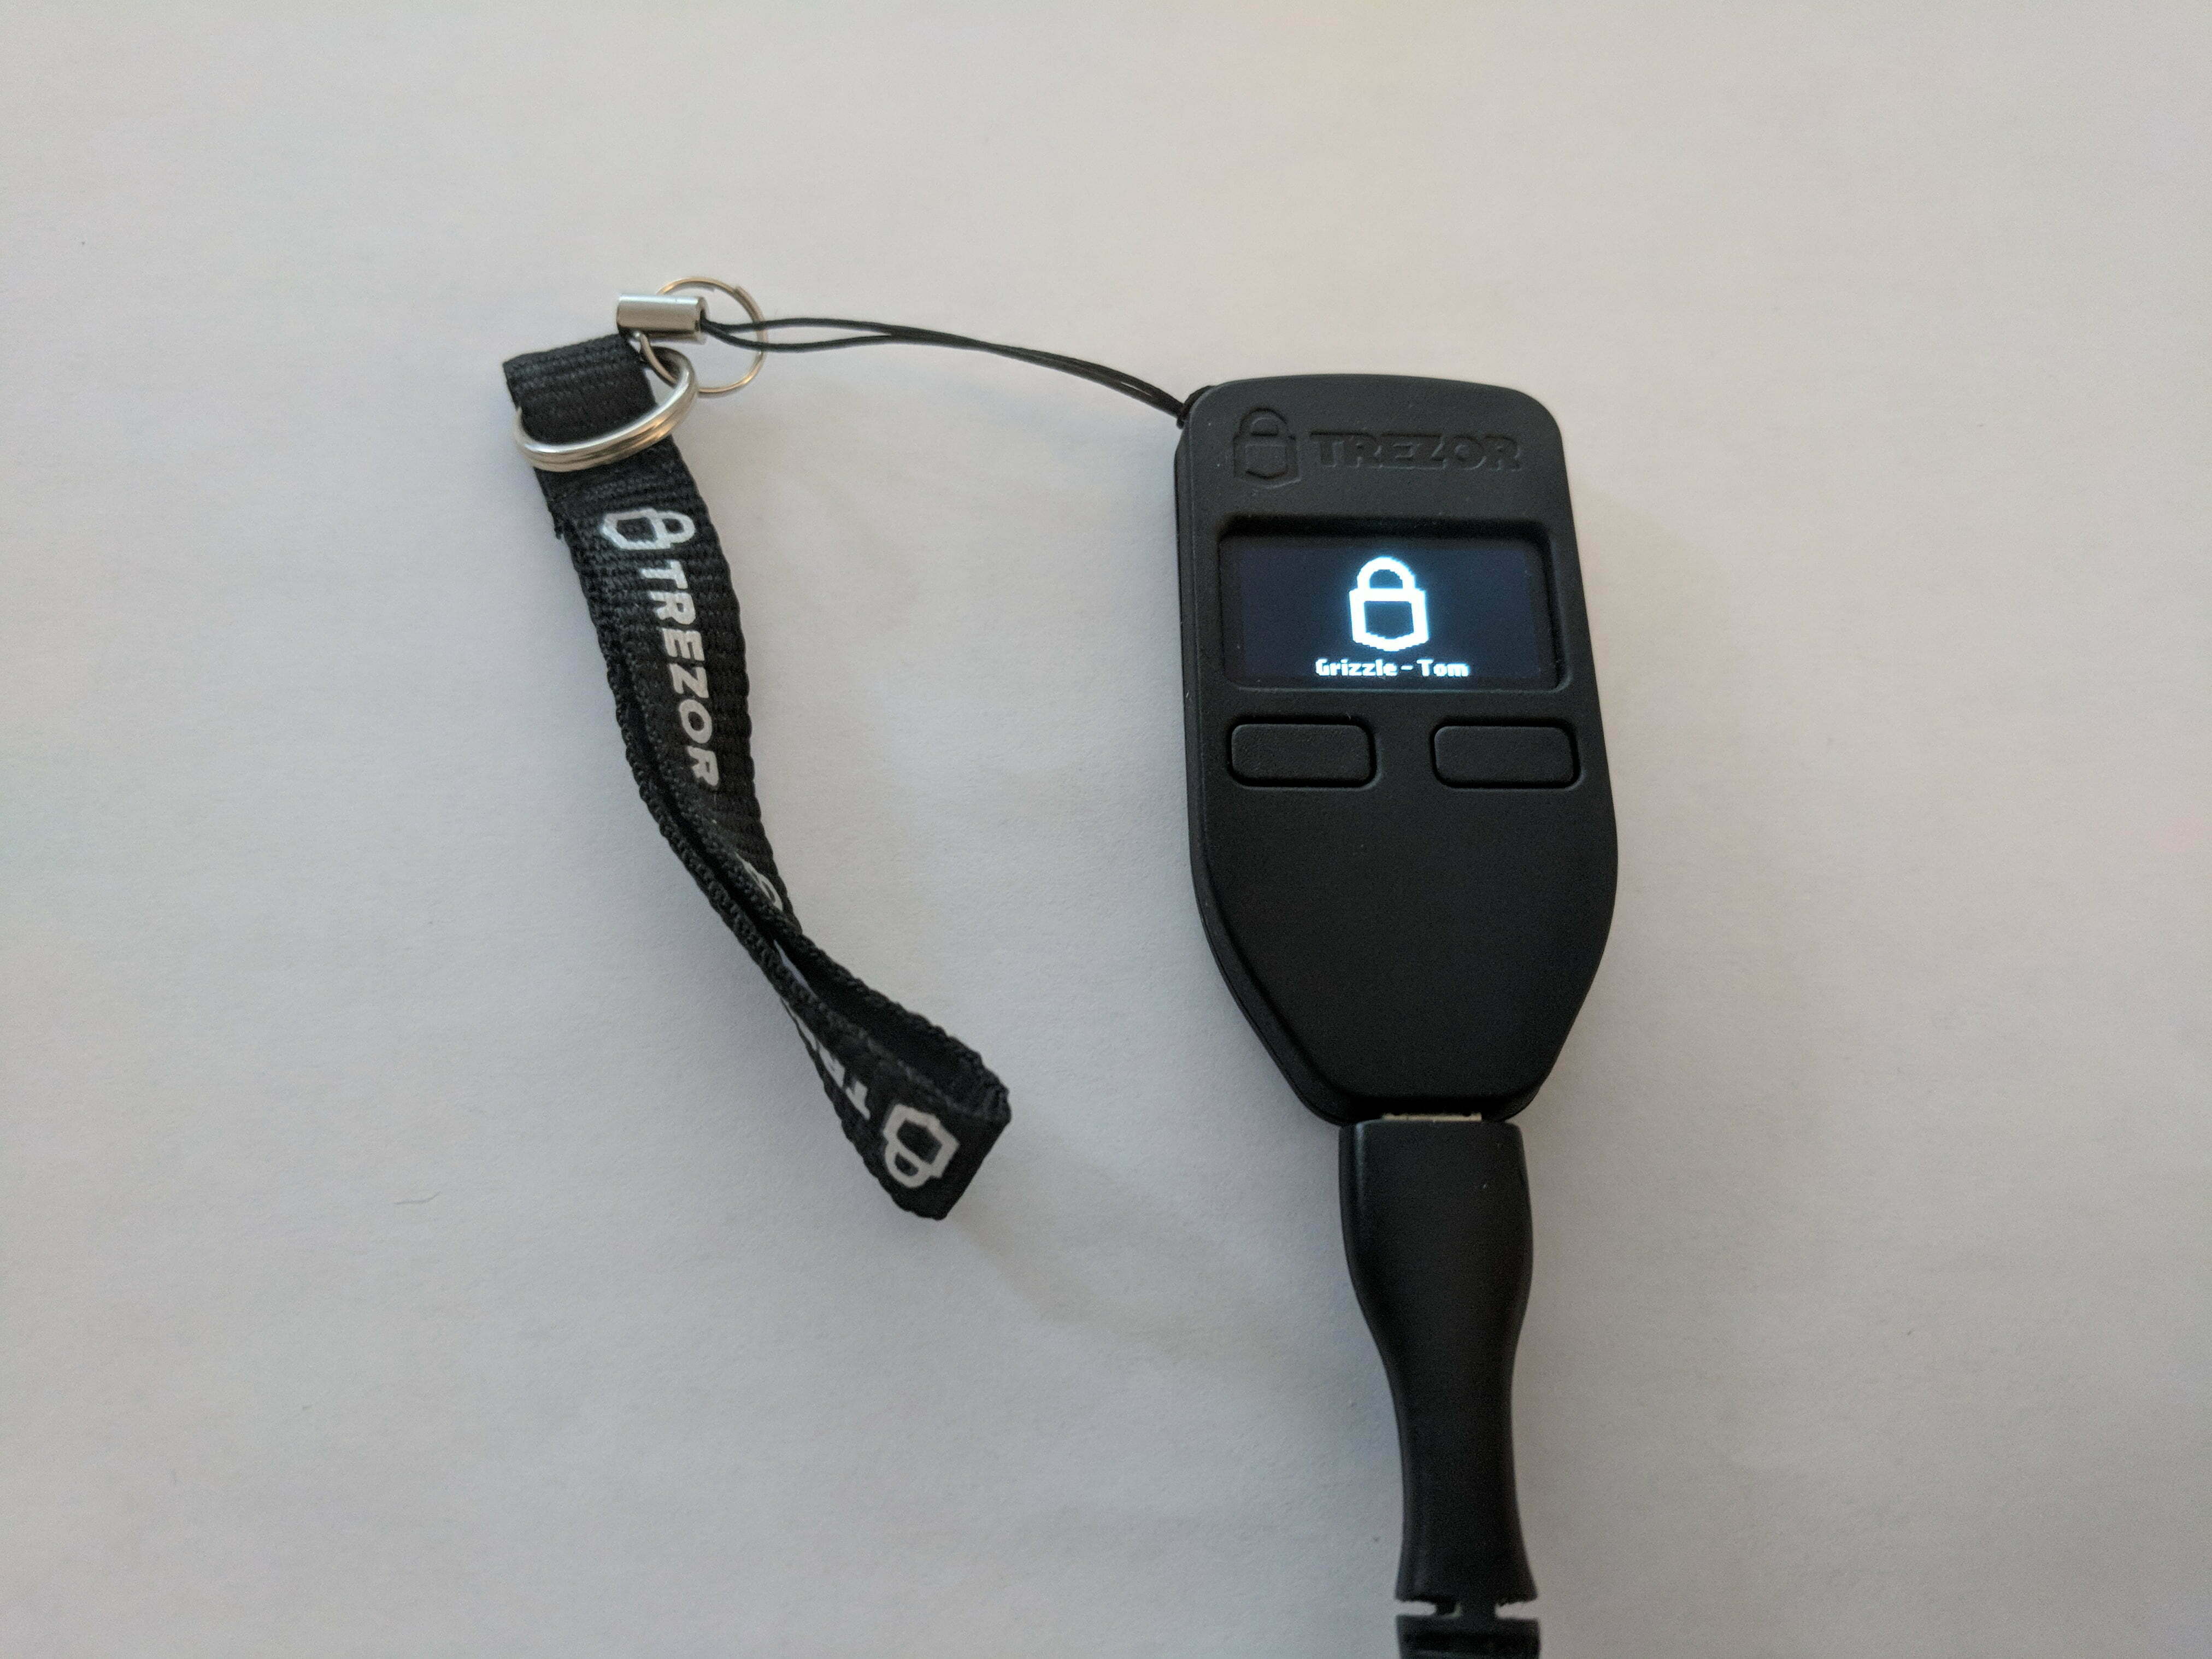
Trezor’s design is small and compact with a minimalistic aesthetic which suits its purpose. Although the device feels well built and sturdy, the materials used don’t lend themselves to the feel of a premium product. Also, it’s distinctive shape identifies the device as something more than a standard USB key if carried on a keychain or publicly visible.
Otherwise the design lends itself well to the useability of the device which fits easily in the hand with the buttons conveniently placed and a bright, easy-to-read screen. The provided cable is quite short (~6”) and may need to be replaced with a longer cable depending on the users access to the USB ports on their computer.
Overall, the Trezor's design is very good and user friendly, but could stand to be improved with more premium materials and a longer cable for those without direct easy access to USB ports.
SETUP PROCESS
Setting up the Trezor was a simple process that involved just a few steps. After downloading the Trezor Bridge software or Chrome Extension from the Trezor start page, the entire setup process is performed within a matter of several minutes, including downloading the latest firmware, setting a PIN, and creating a backup of the device.
The prompts on both the computer and the device itself guide the user through the process, providing helpful security information regarding protection of the backup and setting of the PIN. Immediately after the setup process the Trezor was ready to use, making it one of the most straightforward hardware wallets to get started with quickly.
EASE OF USE & SECURITY
Overall, using the Trezor was very straightforward and will not present any major challenges for beginners while more advanced users will find the additional features they may need as well. It's particularly easy to use the device for the coins supported through the Trezor wallet application, but using any Ethereum-based coins requires users to utilize the integrated MyEtherWallet.
Although MyEtherWallet is a very good platform and still provides users with the same security as the Trezor wallet application, it's not quite as user friendly. Regardless, sending or receiving any coins using the Trezor is quick and both the Trezor wallet application and MyEtherWallet provide clear indications to the user of the appropriate steps along the way.
Trezor has an excellent reputation when it comes to security and provides a good overview of past incidents and responses on their security page. One interesting feature that sets Trezor apart is that it ships to the user without firmware installed, which helps prevent the device from being compromised prior to purchase. Also, the team at Trezor remains active on social media discussing security related issues when it comes to protecting crypto assets. It's recommended to follow @TREZOR to keep up to date on the latest.
SUPPORTED COINS
So what can you store on Trezor? The wallet supports the following 6 coins using the TREZOR Wallet application:
- Bitcoin (BTC)
- Litecoin (LTC)
- DASH (DASH)
- Zcash (ZEC)
- Bitcoin Cash (BCH)
- Bitcoin Gold (BTG)
In addition, through integrations with MyEtherWallet and the NEM Nano Wallet, Trezor supports Ethereum (ETH), Ethereum Classic (ETC), ERC20 tokens, and NEM (XEM).
With a total of 9 coins as well as ERC20 tokens supported, Trezor is in the middle of the pack when it comes to supported coins. Note that Trezor's support documentation also indicates that the device supports Namecoin and Dogecoin, but since no interface currently exists this support is not relevant for the average user.
Trezor also supports several integrations which can be useful to users, including integration with Mycelium and Electrum (two popular software wallets) as well as providing 2-factor authentication (FIDO/U2F) and password management functions through other integrations.
HELP & CUSTOMER SUPPORT
Trezor's document library is a great resource for any users looking to find out more information about how to use the device. The main page helps guide users to the right section of the documentation (FAQ, User Manual, and Apps).
In terms of customer support, up until this point the help materials have been able to answer any of the issues or uncertainties during the preparation of this review. Trezor does have an excellent reputation in general and this review will be updated should support be necessary in the future.
TOTAL SCORE
The Trezor bitcoin wallet provides a good balance between useability and advanced features that helps the beginner crypto investor store their private keys securely. The design is a neat little package that, although made out of plastic, feels sturdy and well built along with a simple yet clear interface. Trezor's web interface is well designed, providing the right balance of ease of use along with additional information for those so inclined.
One area where Trezor could stand to improve in comparison to its competition is in terms of coins supported. The web application provides support for some major crypto assets such as Bitcoin, Bitcoin Cash, Litecoin and DASH, but requires an integration to access Ethereum or ERC20 tokens. The advantages of the clean and simple Trezor web interface are lost through this required integration.
In terms of value, Trezor is listed at $138 USD (€89 + €22 shipping) and is an ideal solution for beginner and novice users interested in the supported crypto assets.
* This link directs you to Amazon as it provides the most options for purchasing this wallet. However, it is important to note that when purchasing a hardware wallet through a third party retailer or vendor to always ensure that the wallet once received has not been tampered with as this could compromise its security and thus the cryptocurrency you will store on it. Each wallet manufacturer typically has tamper resistant packaging or other hardware/software mechanisms to prevent tampering but they are not foolproof. Please only purchase hardware wallets from trusted vendors.
TREZOR – USER GUIDE
How does Trezor work? Continue reading for step-by-step directions on how to set up, backup and recover the device and send and receive coins
1. SETTING UP DEVICE
There are two primary options to start setting up the Trezor:
- Install the Trezor Bridge for Windows, Mac, or Linux
- Install the Trezor Chrome extension
Both options are straightforward, but it's recommended to install the Trezor Bridge as Google is planning to end its support for all Chrome apps.
The following steps help guide the user through the configuration process:
- Go to this page on Trezor's website.
- Install the Trezor firmware by following the prompts on the screen.
- After the firmware is installed replug the device into a USB port.
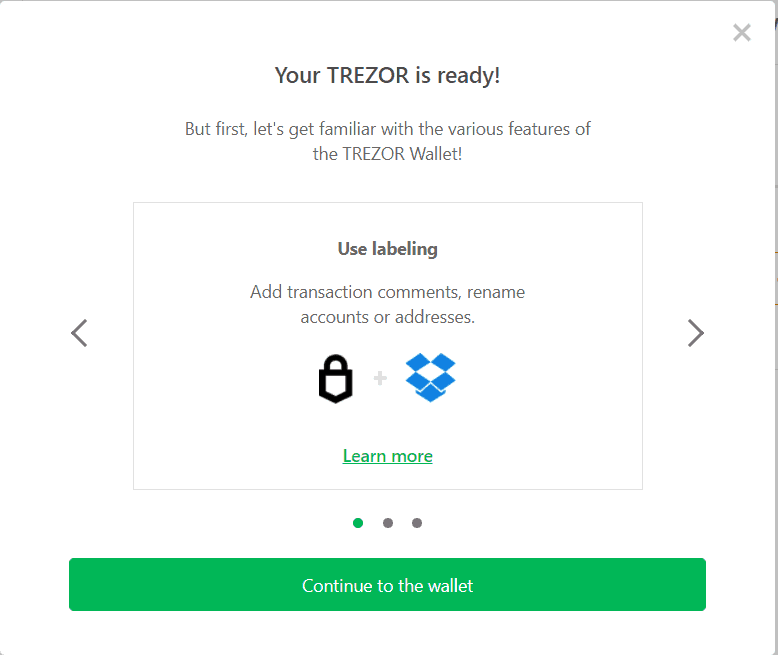
- Select 'Create new'.

- Select 'Continue to the wallet'.
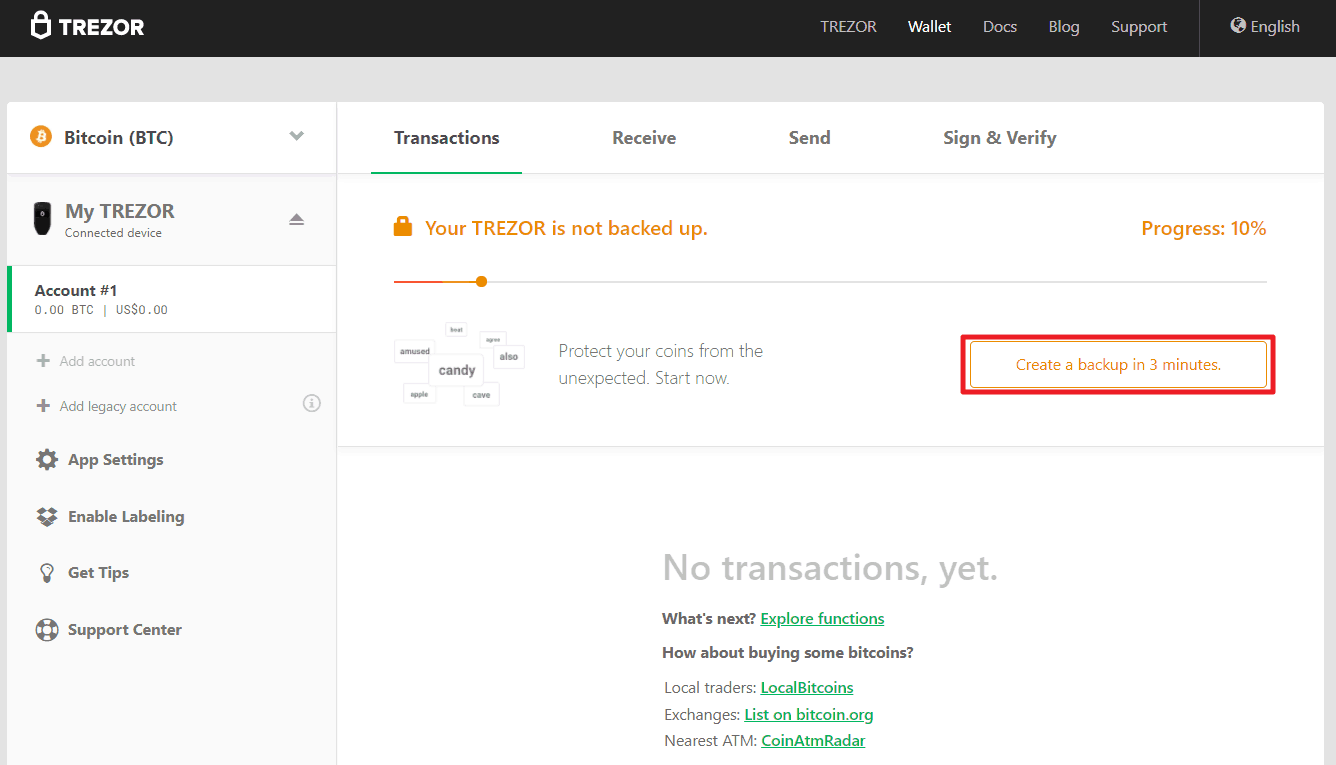
- Select 'Create a backup in 3 minutes'.
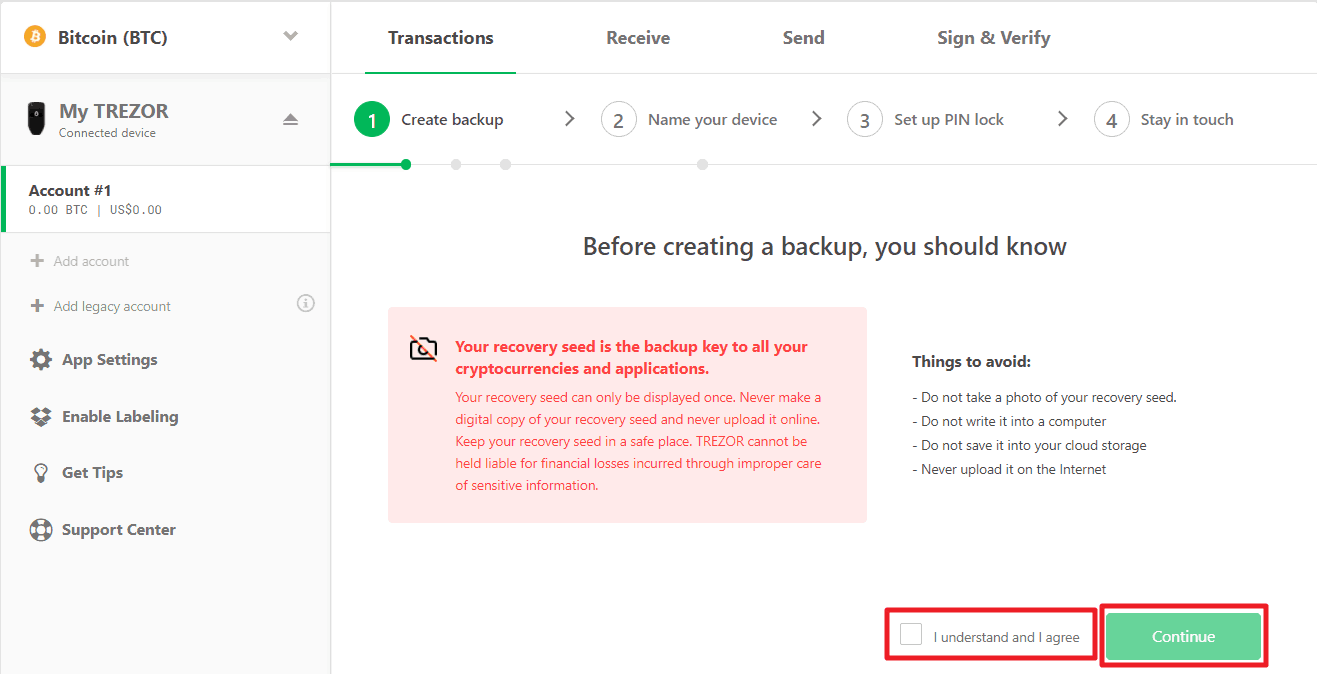
- The next step of backing up the device is important to ensure that crypto assets on the Trezor can be recovered in case of loss. Review the important information on the following screen then select 'I understand and I agree' and 'Continue'.
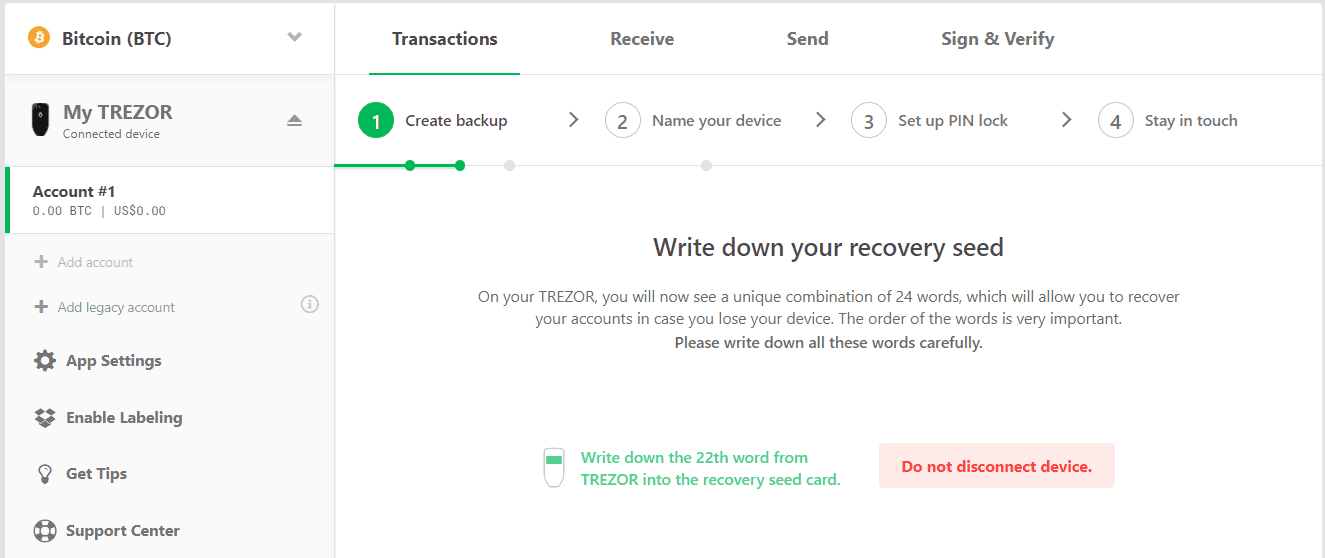
- Write down each word shown on the device into the recovery sentence card provided with the device. Once written down, press the right button on the device to move to the 'Next' word. Continue until all 24 words have been written down.
- Check each word in the recovery phrase by selecting the right button on the device and referring to the completed recovery sentence card from the previous step. Be sure to double and triple check spelling as this is the only means to recover wallets on the device if it's lost or stolen and will only be displayed once.
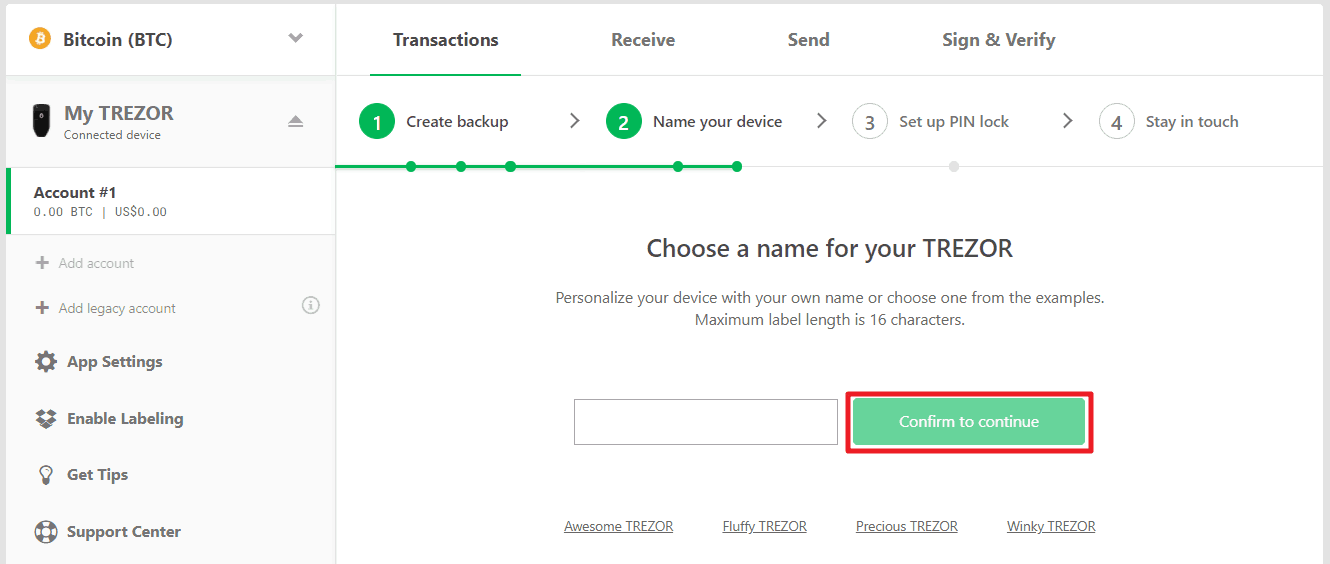
- Press continue and then provide a name for the device and press 'Confirm to continue' then press the right button on the device to 'Confirm'.
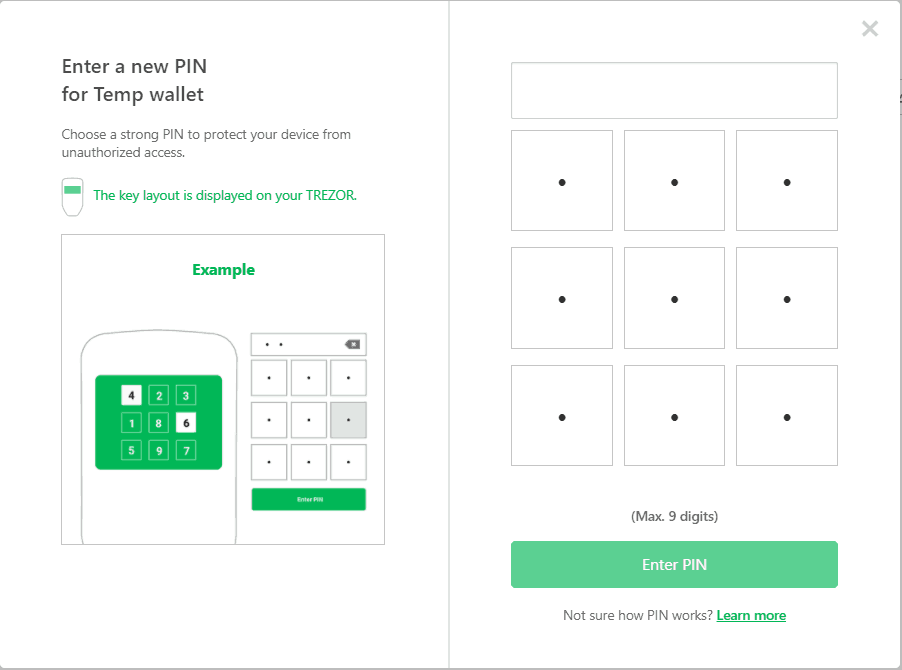
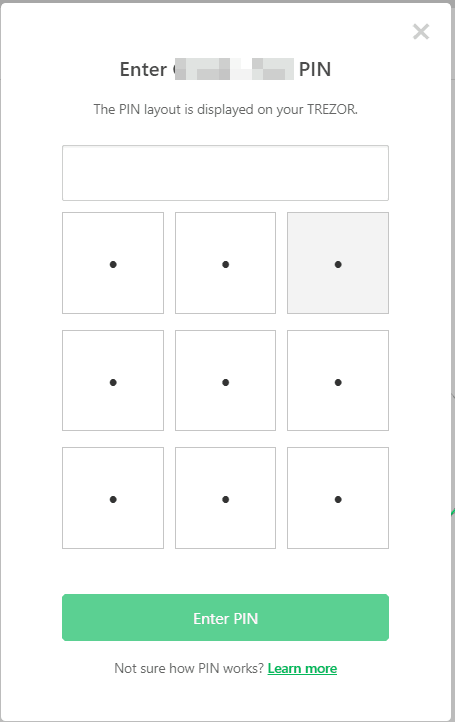
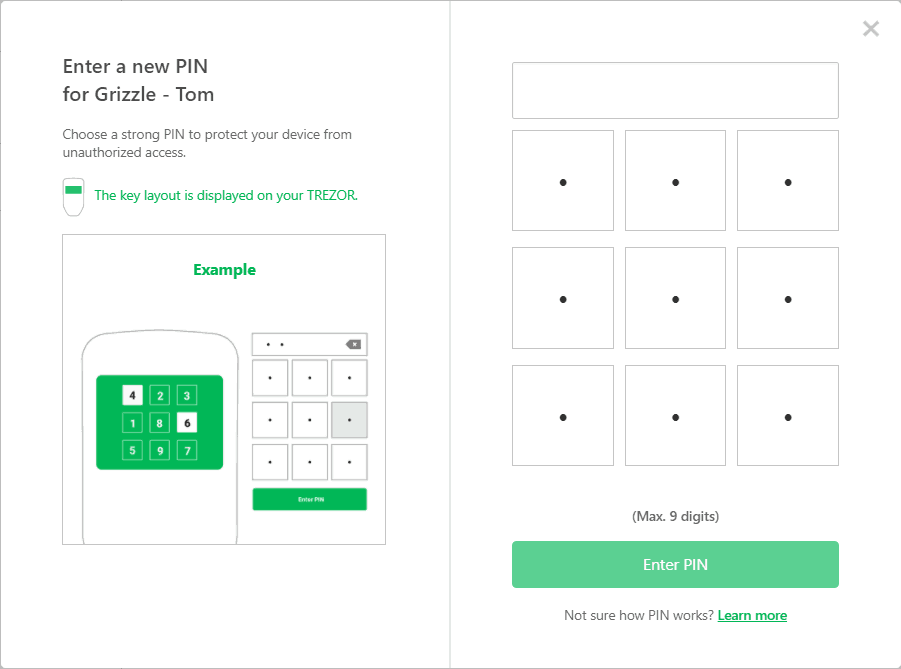
- Press 'Continue' and then the right button on the device to confirm setting a PIN for the device. Choose a PIN for the device (6+ digits recommended); this is done by looking at the screen on the device showing numbers in a randomized order and then clicking the position of the number in the browser.
- Re-enter the PIN to confirm the value, noting that the placement of the numbers on the device will have changed
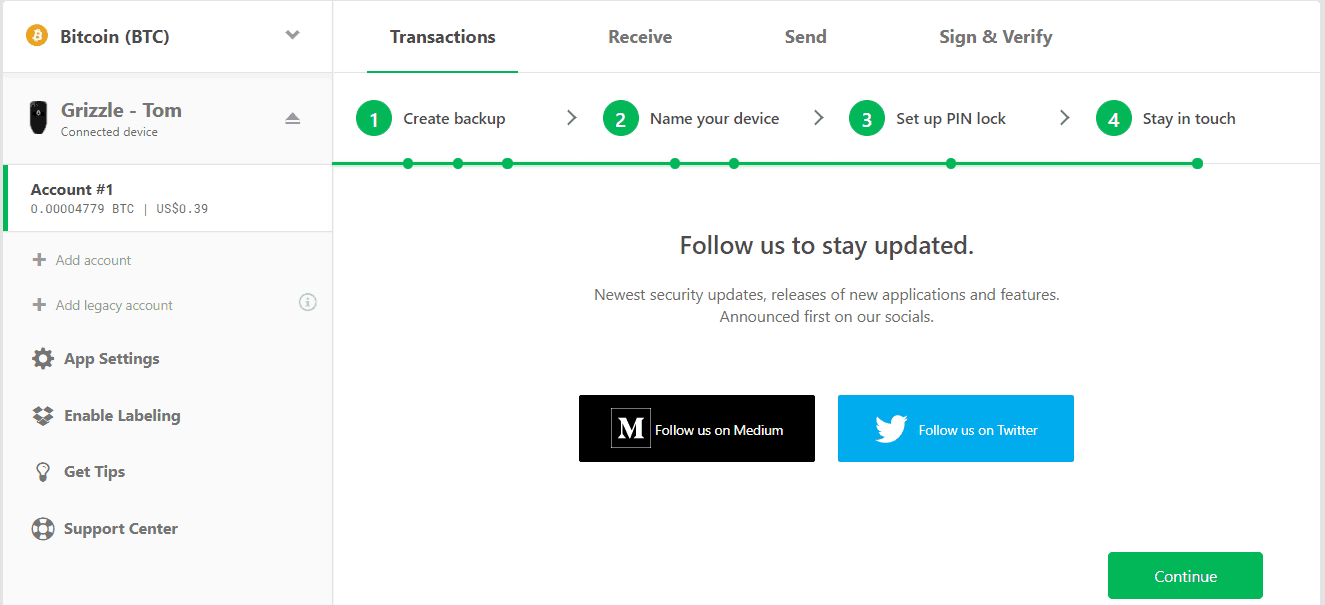
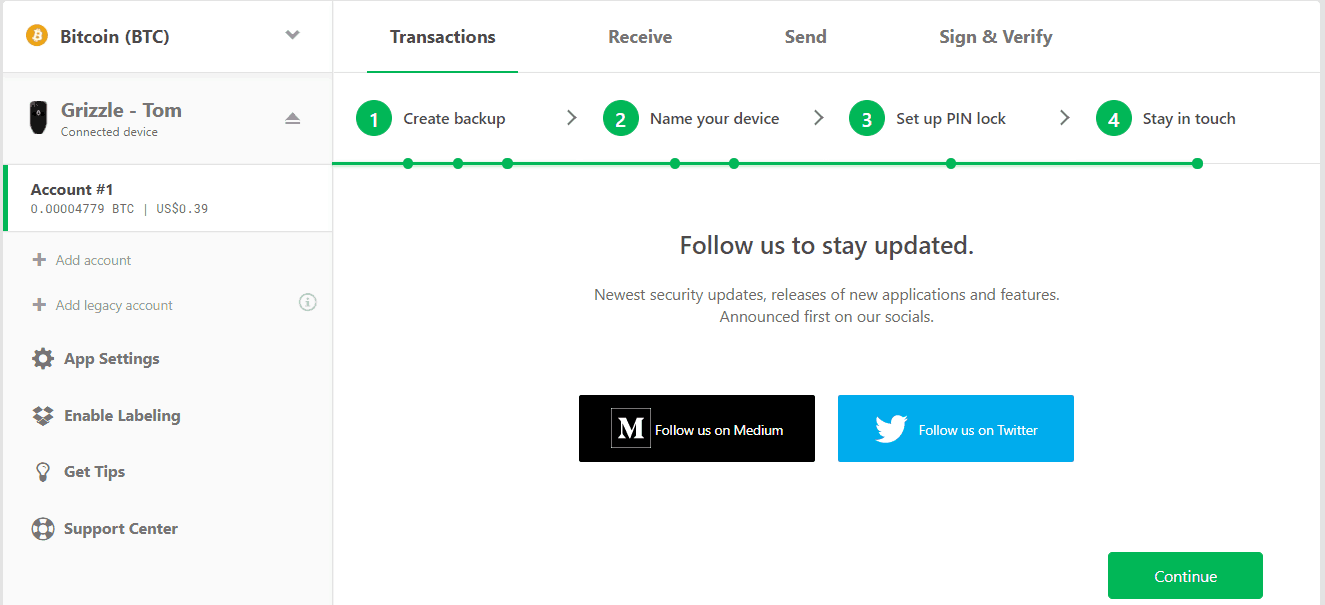
- Select 'Continue' and then if desired follow Trezor on Medium or Twitter to keep up to date with news related to the wallet, including advising on updates to the device's software.
2. RECEIVING COINS
How to Transfer Bitcoin to Trezor
You can receive Bitcoin (BTC) on the Trezor wallet by following these steps:
- Go to this page on Trezor's website.
- Plug the Trezor into a USB slot.
- Enter the PIN for the device on the computer by referring to the numeric locations on the device and press 'Enter'.
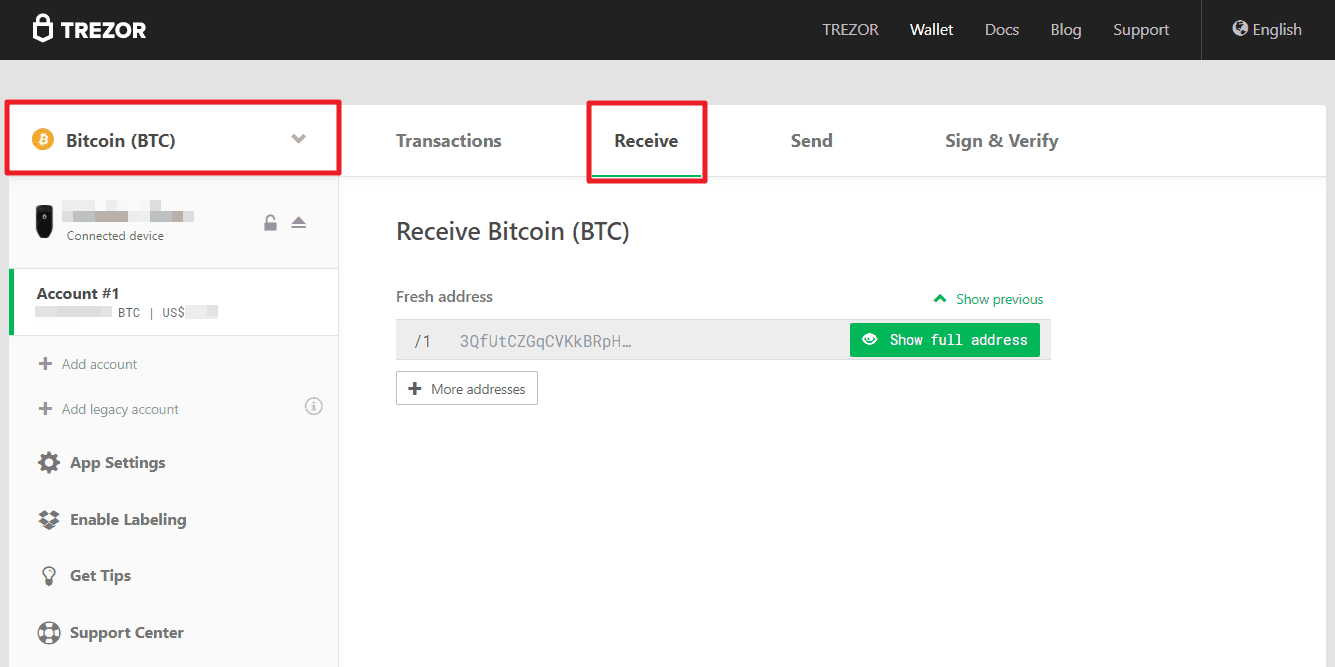
- Ensure that the coin is selected to Bitcoin (BTC), select 'Receive' and select 'Show Full Address'.
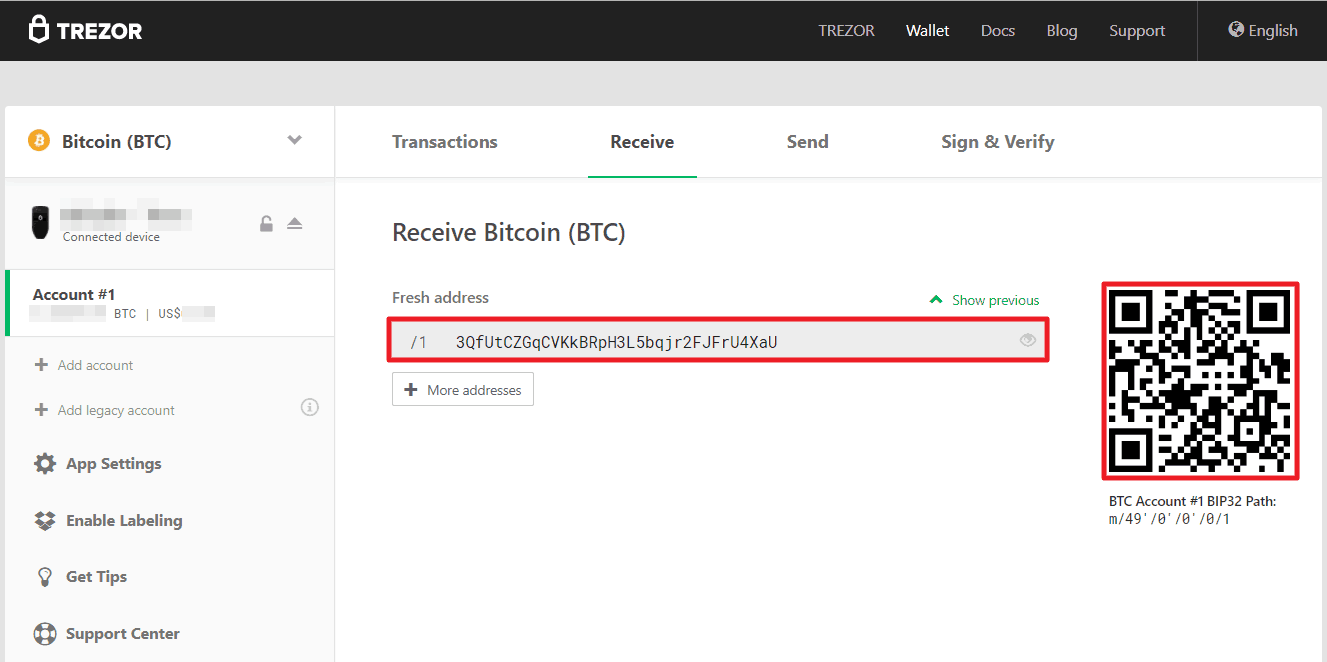
- Confirm the address shown in the browser is the same as that shown on the screen of the device and press the right button to 'Continue'.
- The wallet public address and QR code are now visible and can be captured or copied then provided to the sender.
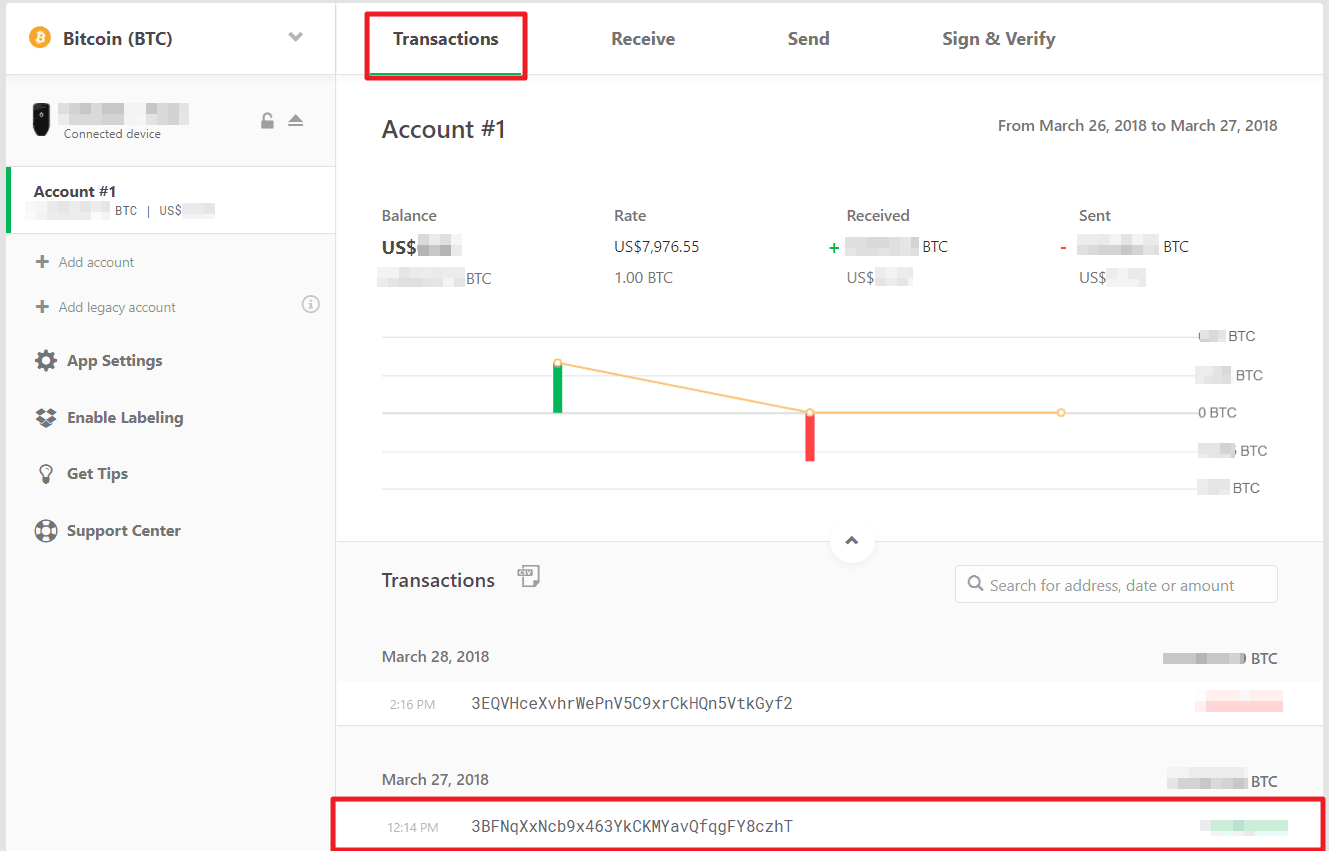
- Once the bitcoin has been sent, the transaction information can be seen by selecting the 'Transactions' section.
- Details of the transaction can be viewed by clicking on the time of the transaction, which will open the transaction details in Trezor’s own block explorer.
How to Transfer Ethereum to Trezor
Not only can you store Ethereum on Trezor, but you can also store Ethereum Classic (ETC) or any ERC20 token. Transferring Ethereum requires integrating with MyEtherWallet.
- Go to this page on Trezor's website.
- Plug the Trezor into a USB slot.
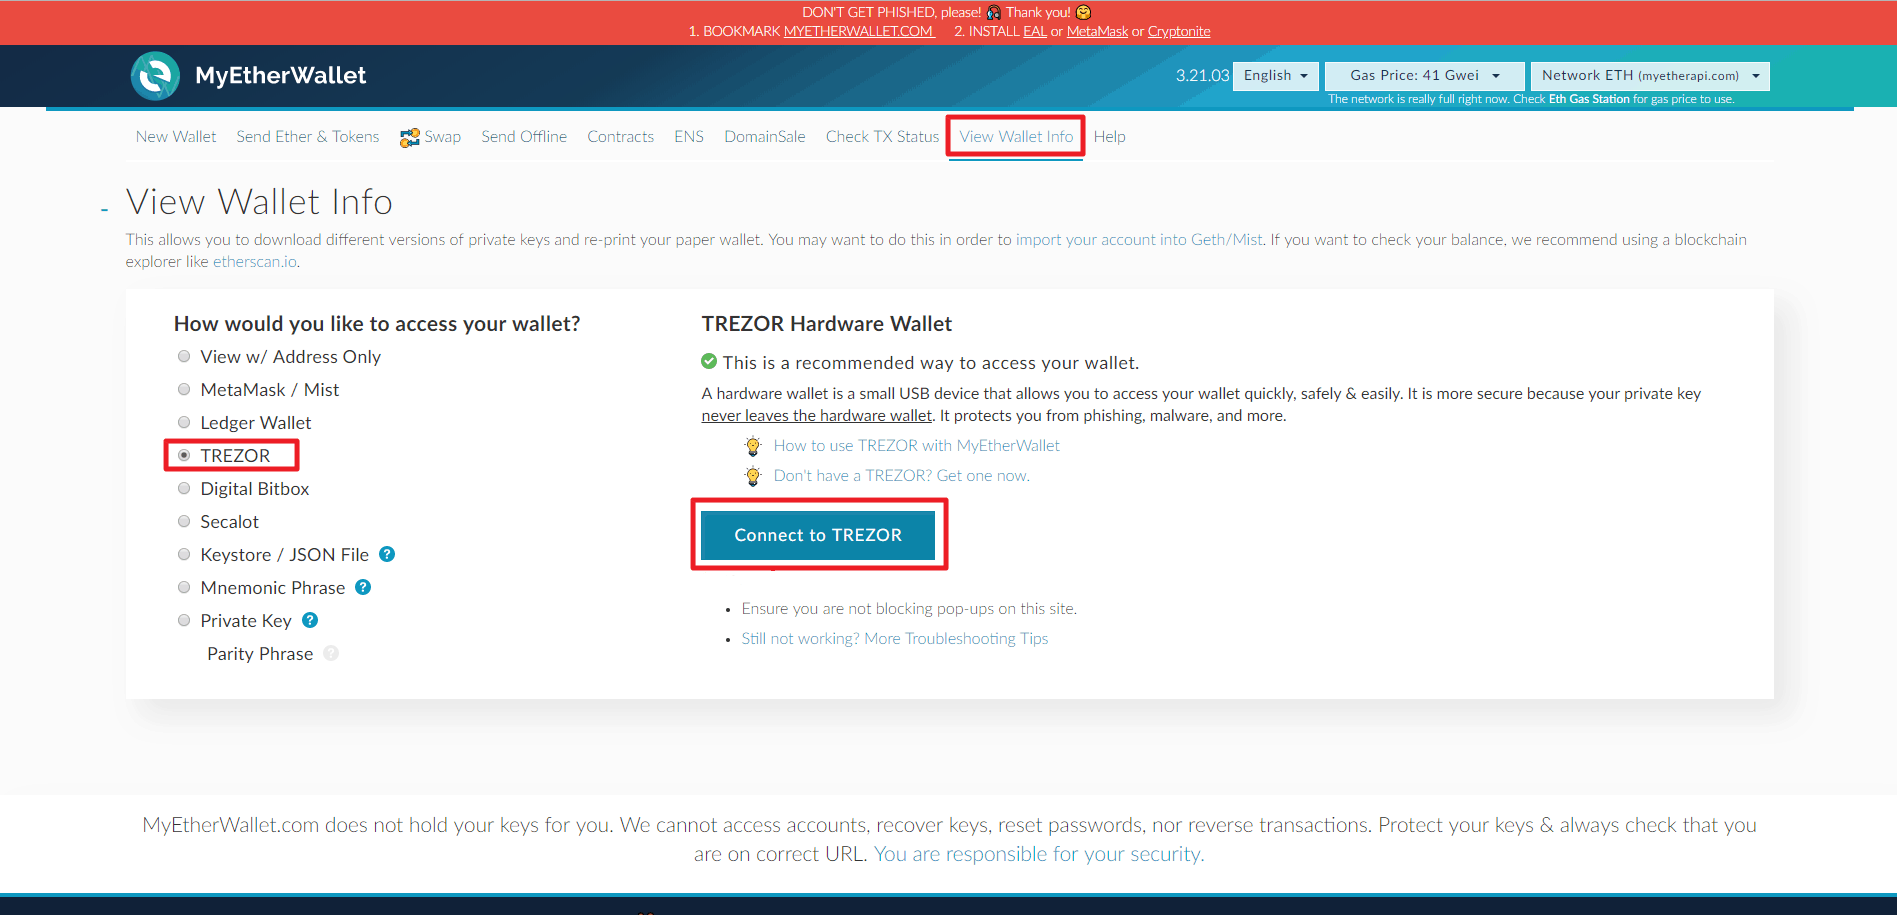
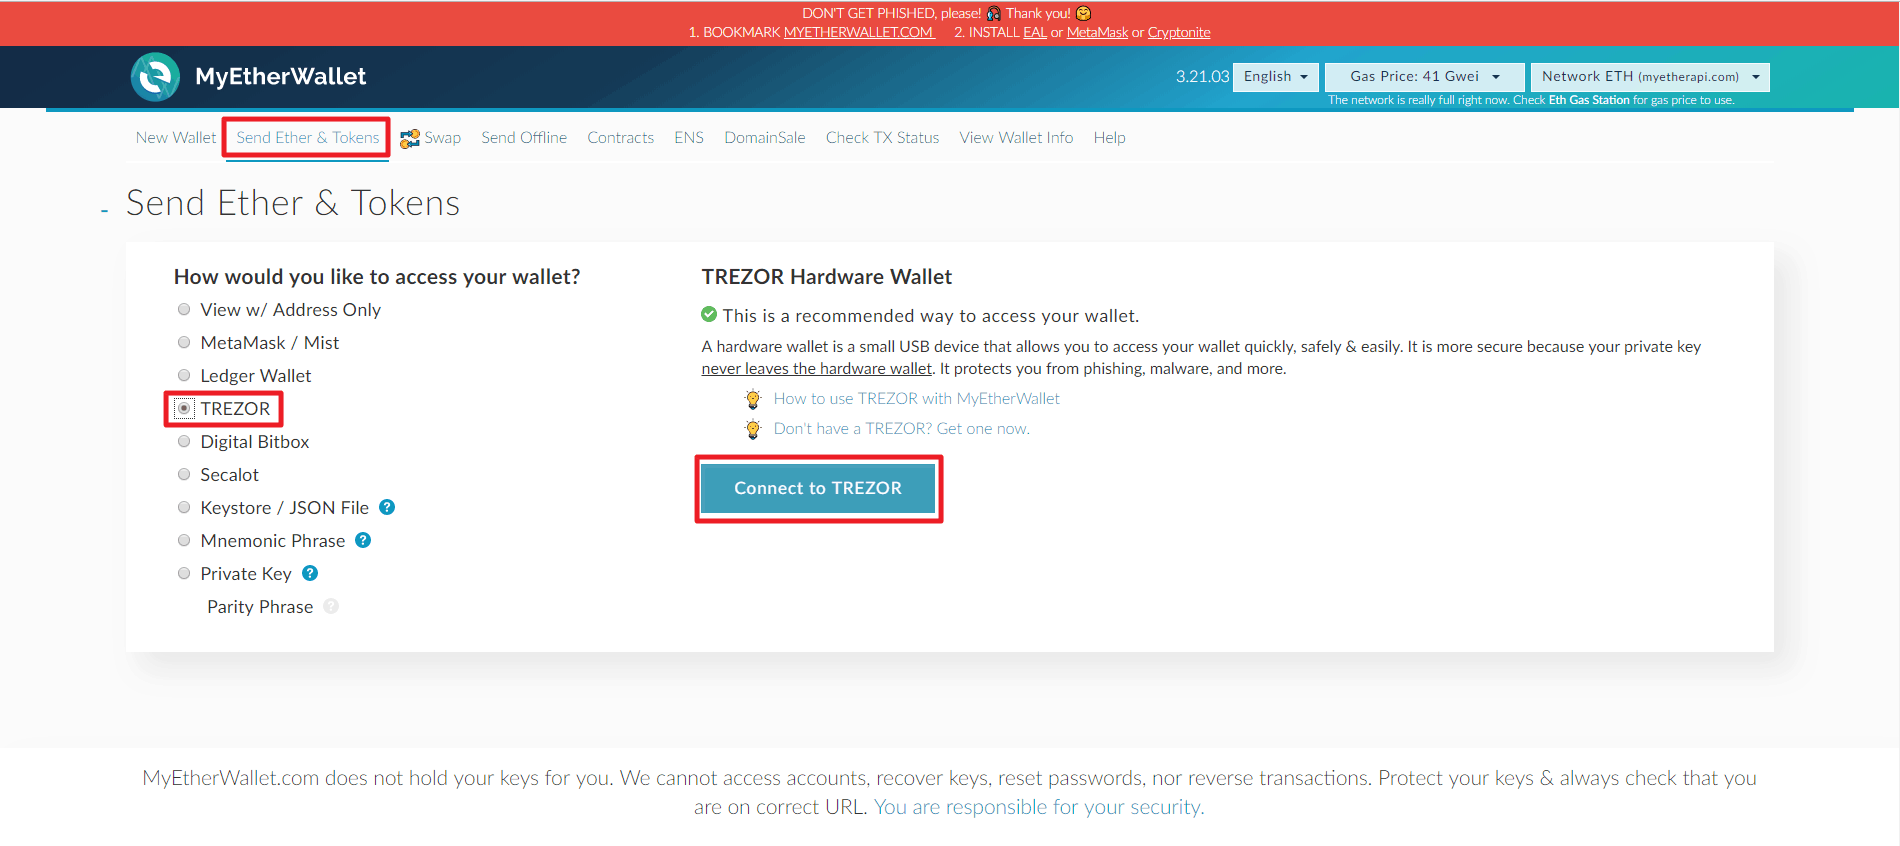
- Select ‘TREZOR‘ then select 'Connect to TREZOR'.
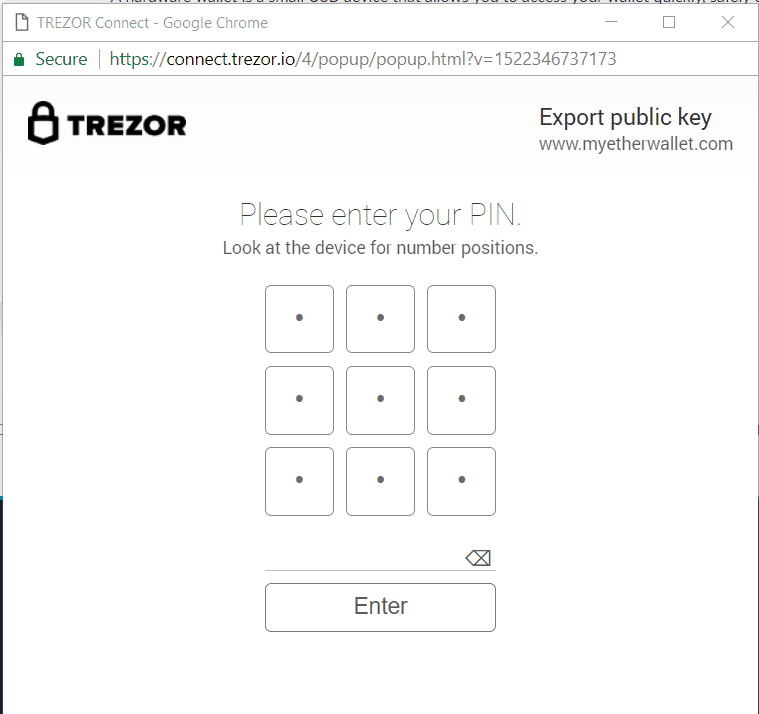
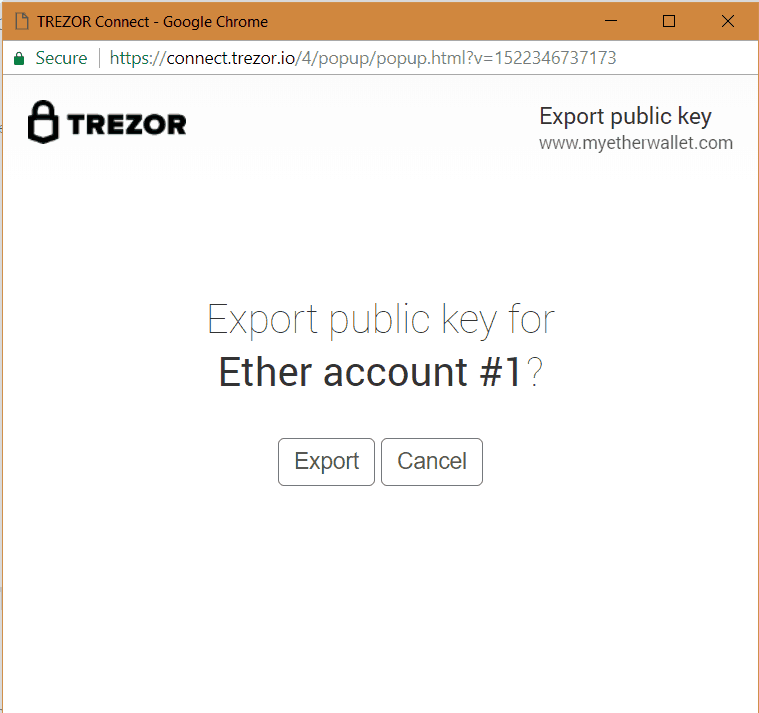
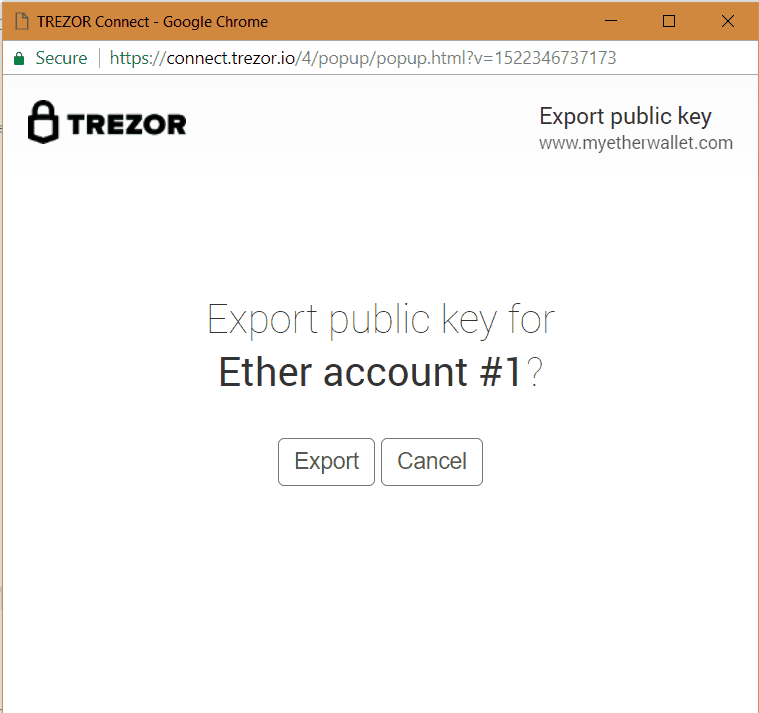
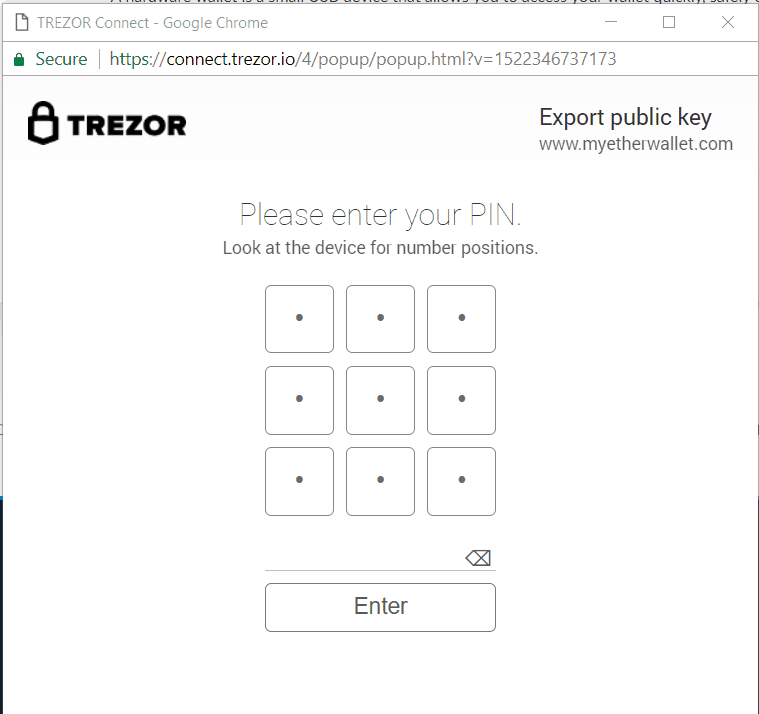
- Enter the PIN for the device on the computer by referring to the numeric locations on the device and press 'Enter', then once prompted click on ‘Export’.
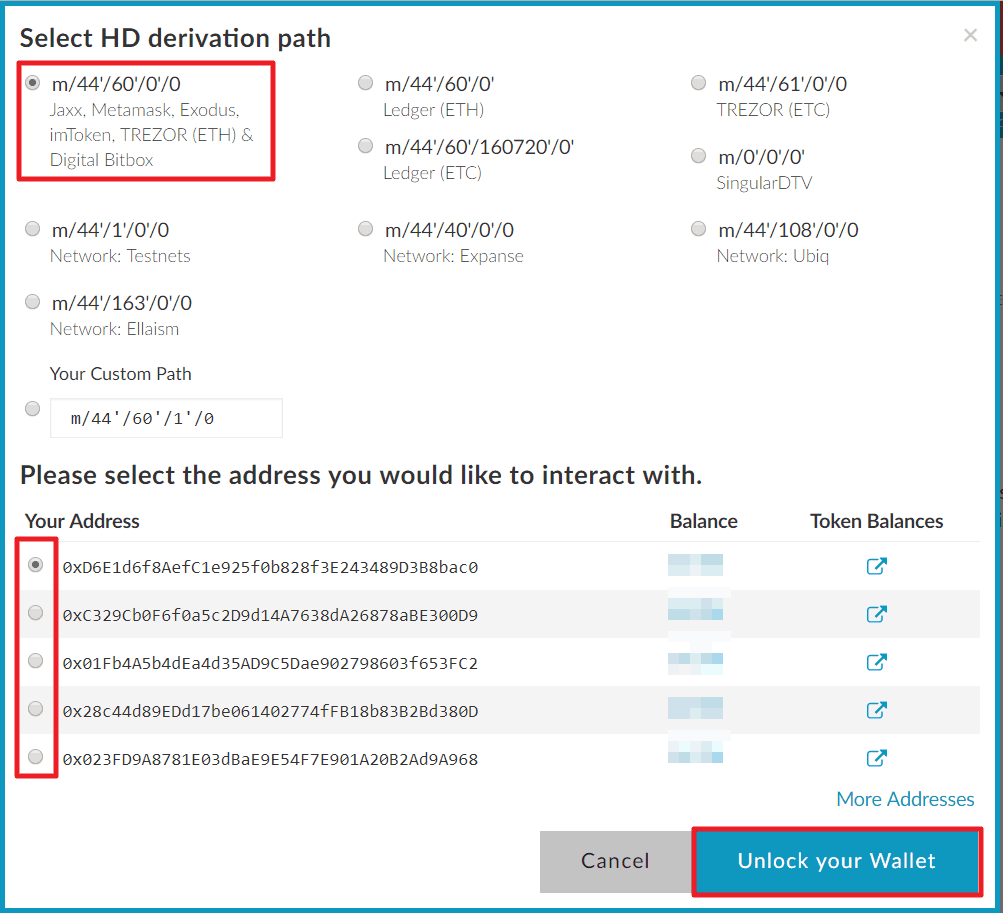
- Leave the ’Derivation Path‘ as the default unless the coins you have transferred onto the wallet used a different derivation and select the address of the wallet to use then select ’Unlock your Wallet’.
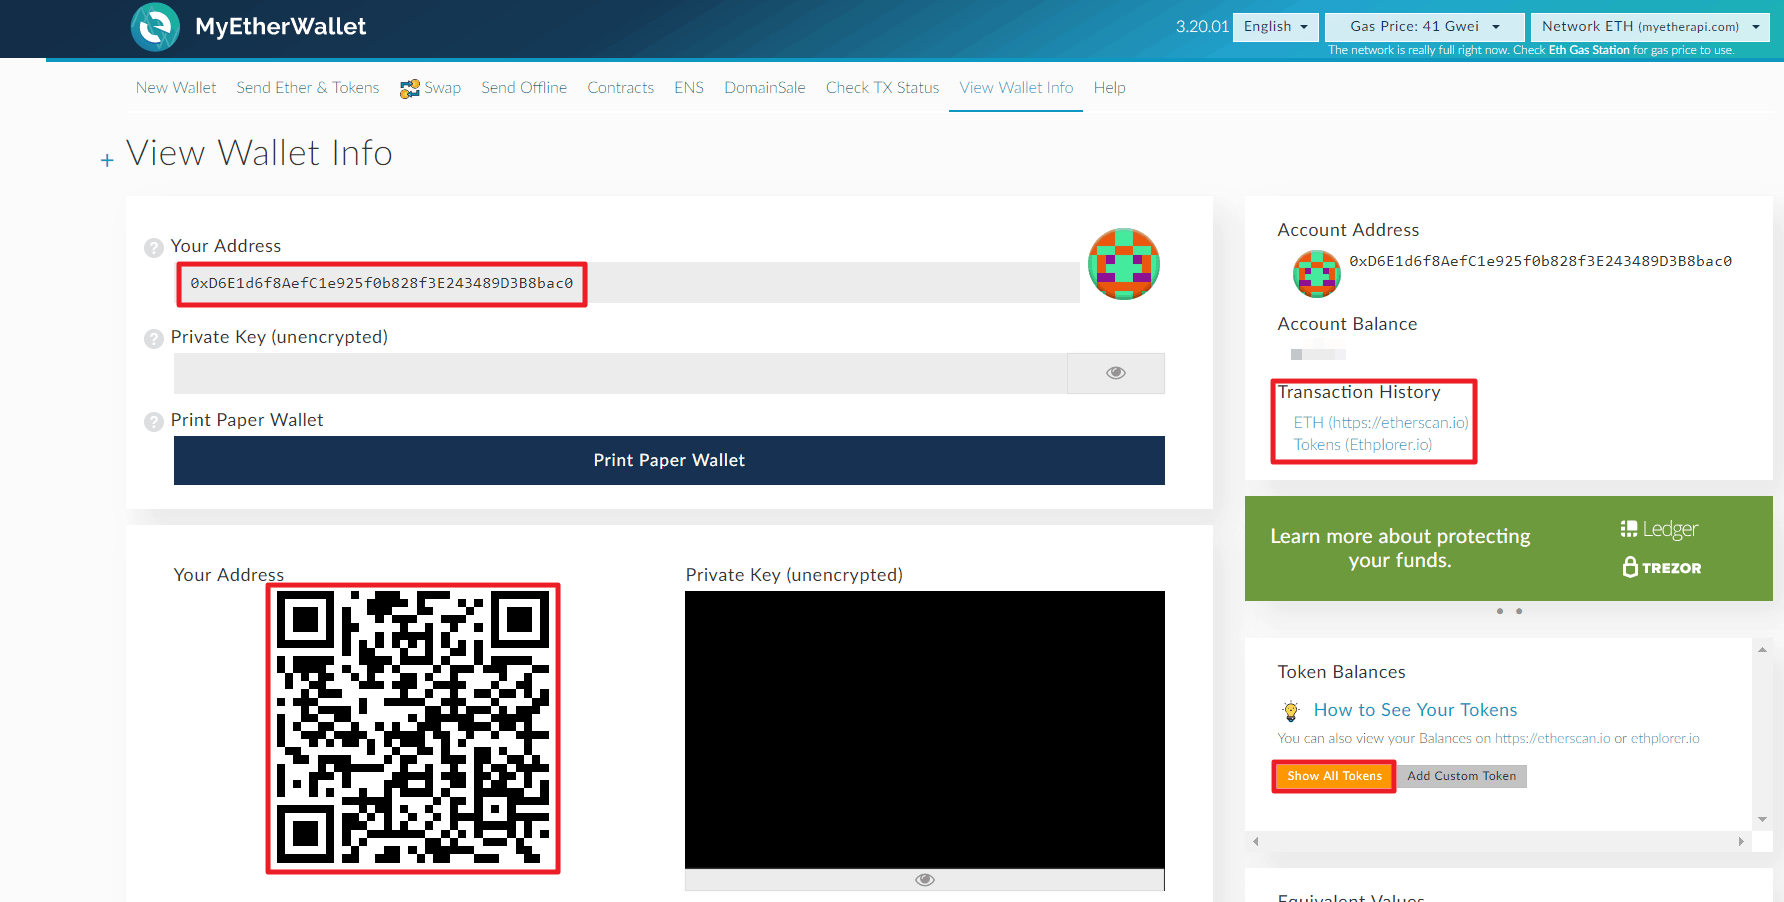
- The wallet public address and QR code are now visible and can be captured or copied for use in the sending application. Note that there are also links to Etherscan to view transaction history for the wallet and a separate link to view token balances on Etherscan.
3. SENDING COINS
Sending Bitcoin
Sending Bitcoin (BTC) is accomplished through the Trezor Wallet:
- Go to this page.
- Plug the Trezor into a USB slot.
- Enter the PIN on the computer by referring to the numeric locations on the device and press 'Enter'.
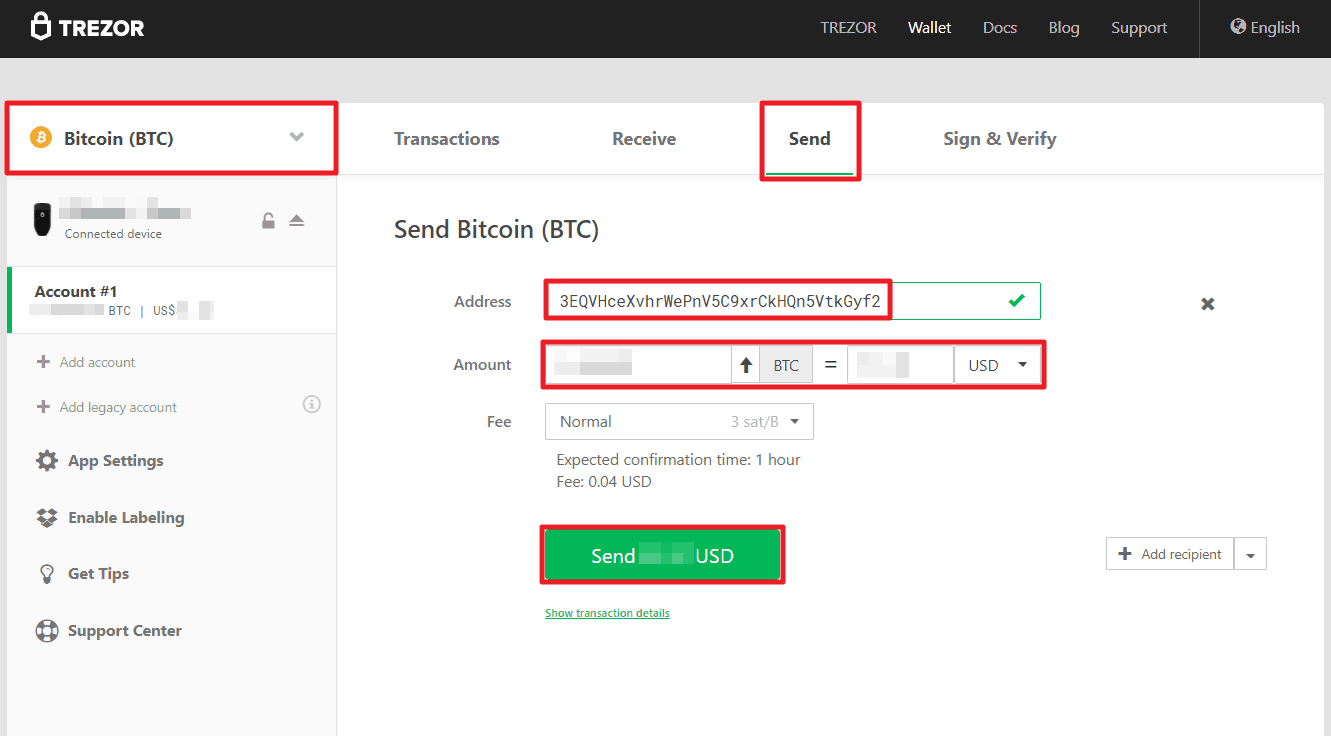
- Ensure that the coin is selected to Bitcoin (BTC), select 'Send' and then enter in the address to send the bitcoin to, the amount in either BTC on the left OR any other currency on the right and press 'Send'.
NOTE: The Fee can be adjusted from the dropdown and the amount of the fee as well as the expected confirmation time will be adjusted accordingly.
- Enter the PIN on the computer by referring to the numeric locations on the device and press 'Enter'.
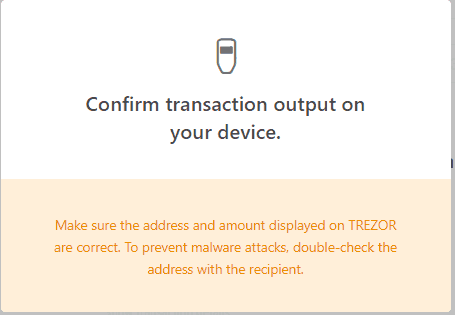
- Confirm the transaction amount and address on the device is correct and select the right button to Confirm.
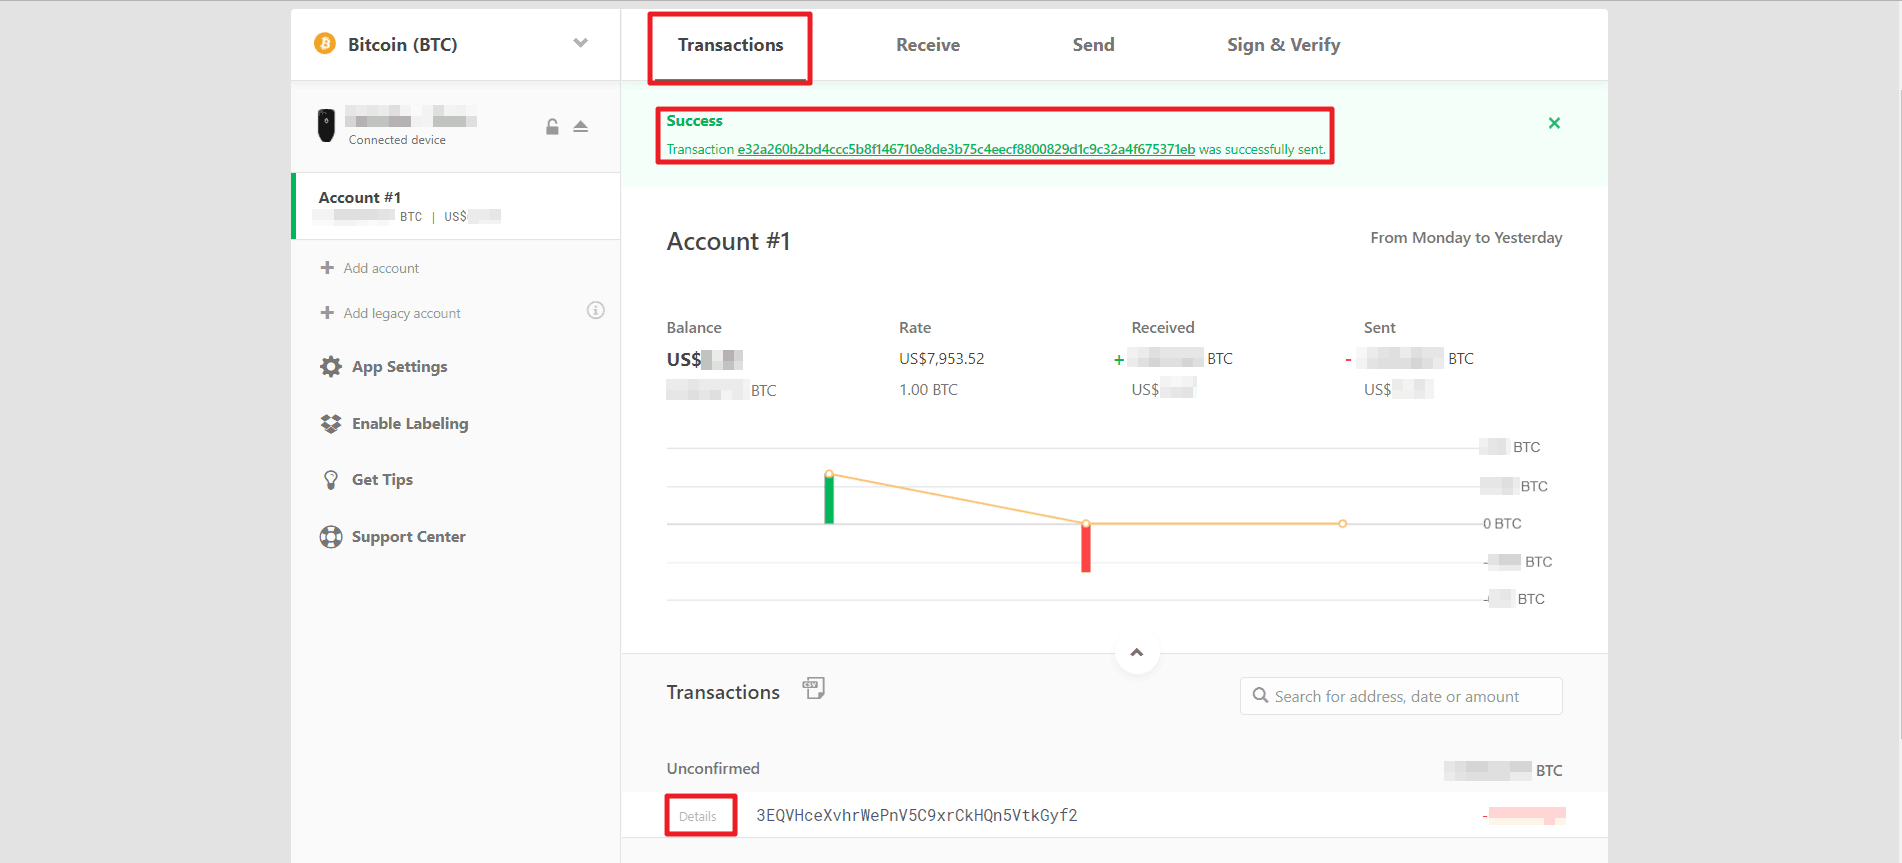
- A success message will now be shown on the 'Transactions' screen and the details of the transaction can be opened in the Trezor block explorer by selecting the transaction number or by selecting 'Details' in the 'Unconfirmed' section below.
NOTE: It is standard to wait until 6 confirmations or about 1 hour to ensure the transaction has been processed correctly.
Sending Ethereum
Sending Ethereum (ETH), Ethereum Classic (ETC), or any ERC20 token is also accomplished through the integration with MyEtherWallet.
- Go to this page.
- Plug the Trezor into a USB slot.
- Select ‘TREZOR‘ then select 'Connect to TREZOR'.
- Select ‘Export’ then when prompted enter the PIN on the computer by referring to the numeric locations on the device.
- Leave the ’Derivation Path‘ as the default unless the coins you have transferred onto the wallet used a different derivation and select the address of the wallet to use then select ’Unlock your Wallet’.
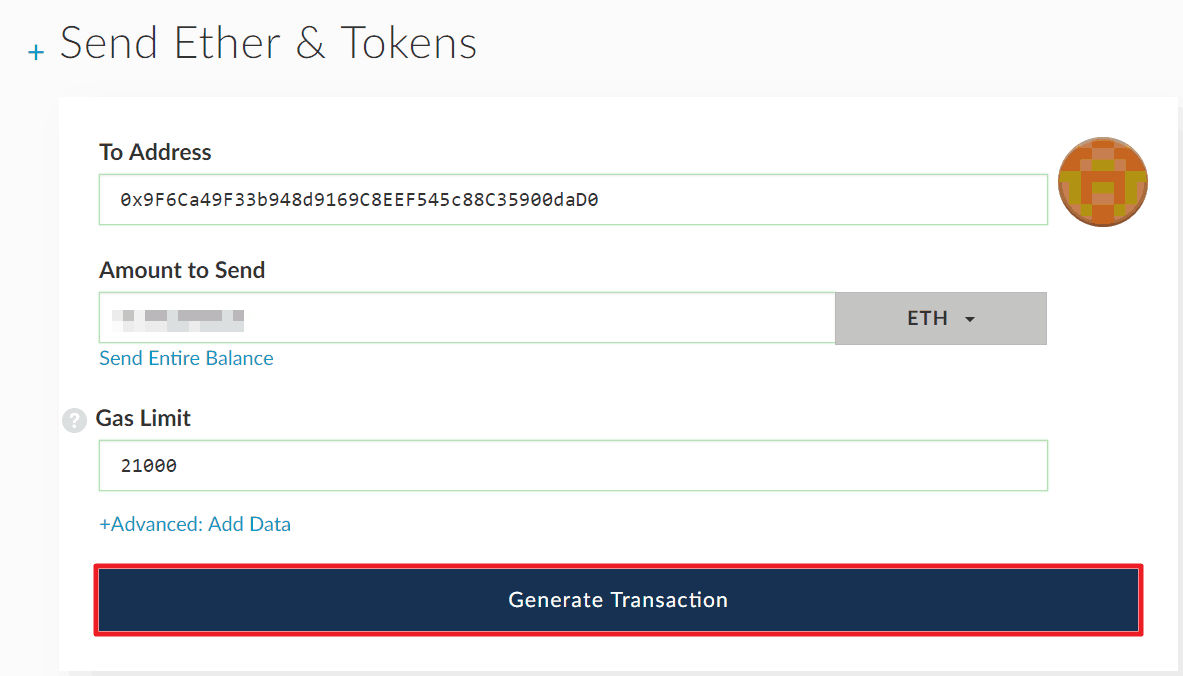
- Enter in the destination for the ’To Address‘ and the ’Amount to Send‘ (click ’Send Entire Balance‘ to clear out the wallet) then select ’Generate Transaction’.
- Review the transaction information on the device including the amount to send and the to address and select the button on the right side of the device to confirm or on the left side to cancel the transaction.
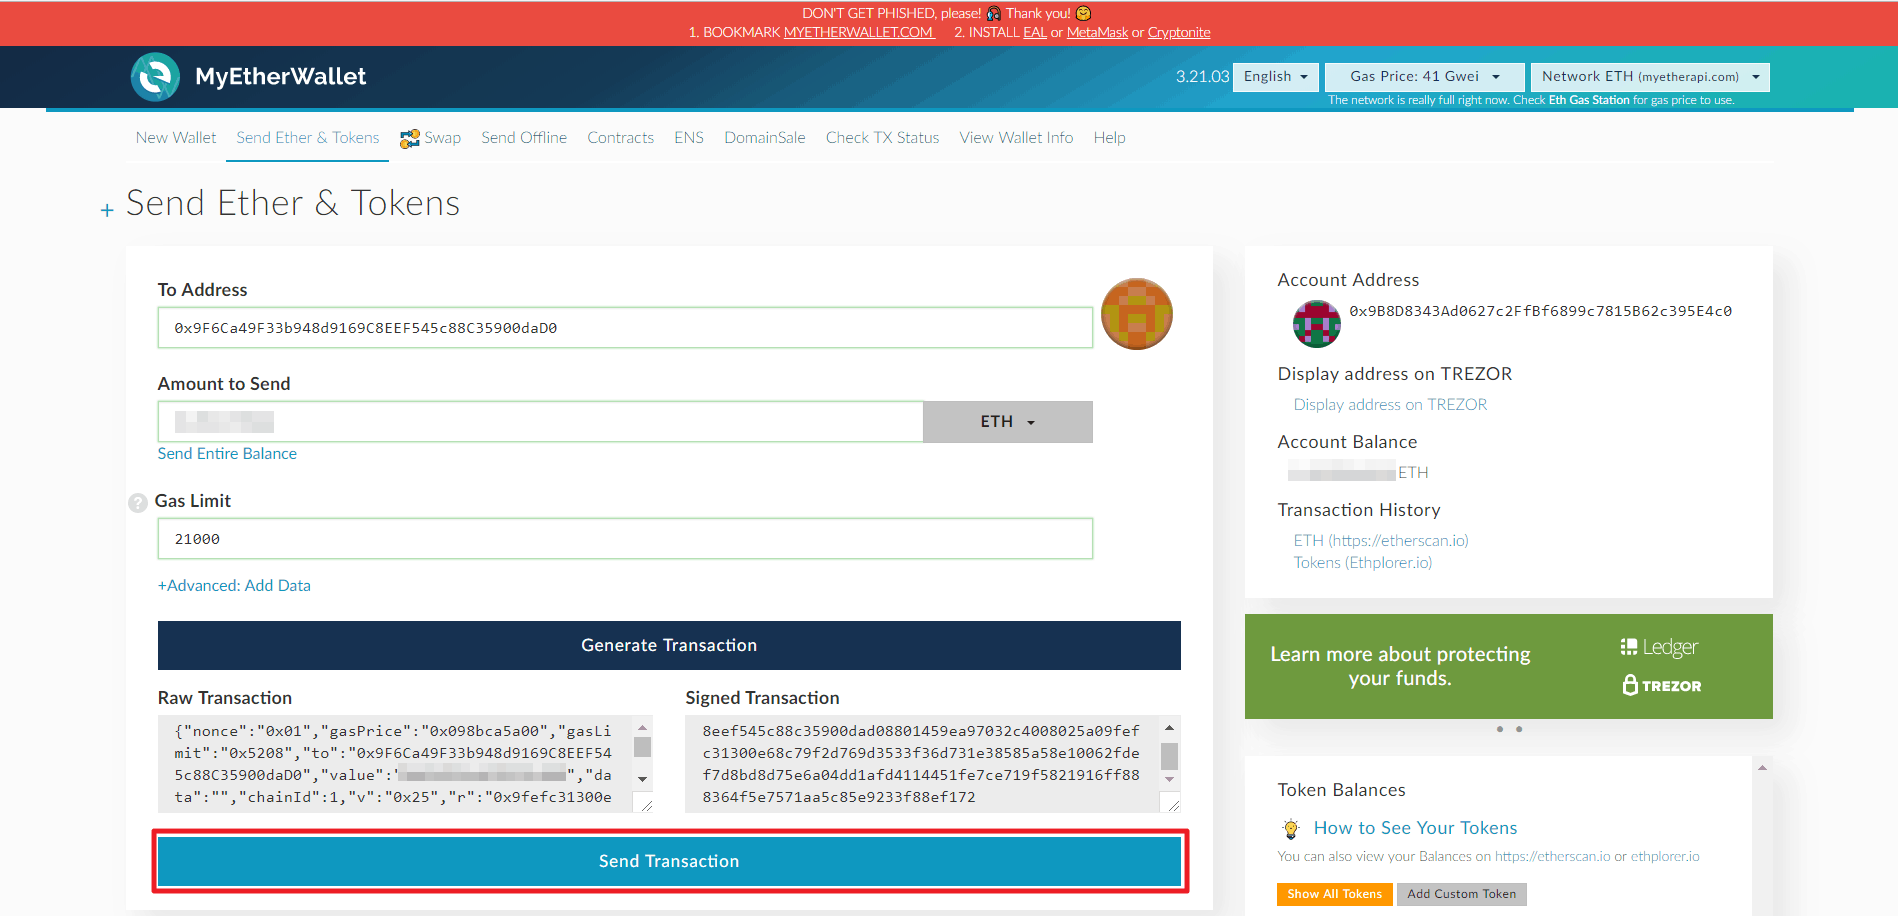
- Review the Raw and generated transaction to confirm the addresses are correct then select ’Send Transaction’.
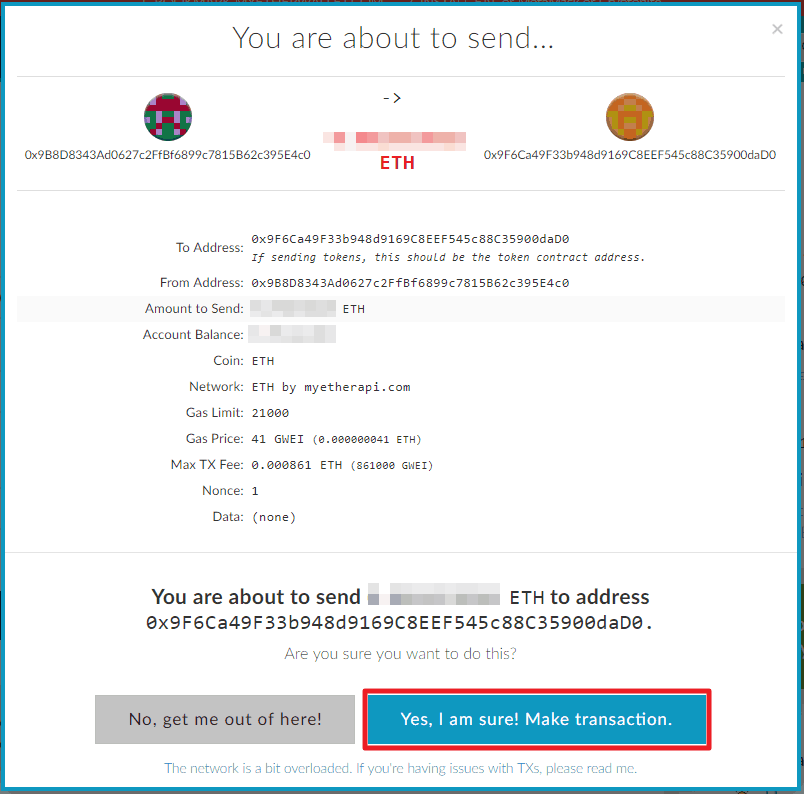
- MyEtherWallet will request a confirmation of the transaction. Review the details again then select ‘Yes, I am sure! Make transaction'.
- MyEtherWallet will display a success message at the bottom of the browser. Select 'Check Tx Status' to view the updated status of the transaction on the etherscan.io block explorer.
4. BACKUP & RECOVERY
The backup of the Trezor is performed at the time of setup and is stored on the recovery sentence card. This card should be kept in a private, secure location, separate from the Trezor itself.
Restoring the Trezor is done using the recovery sentence card. To recover the wallets on a new or wiped Trezor:
- Go to this page.
- Plug the new or wiped Trezor into a USB port.
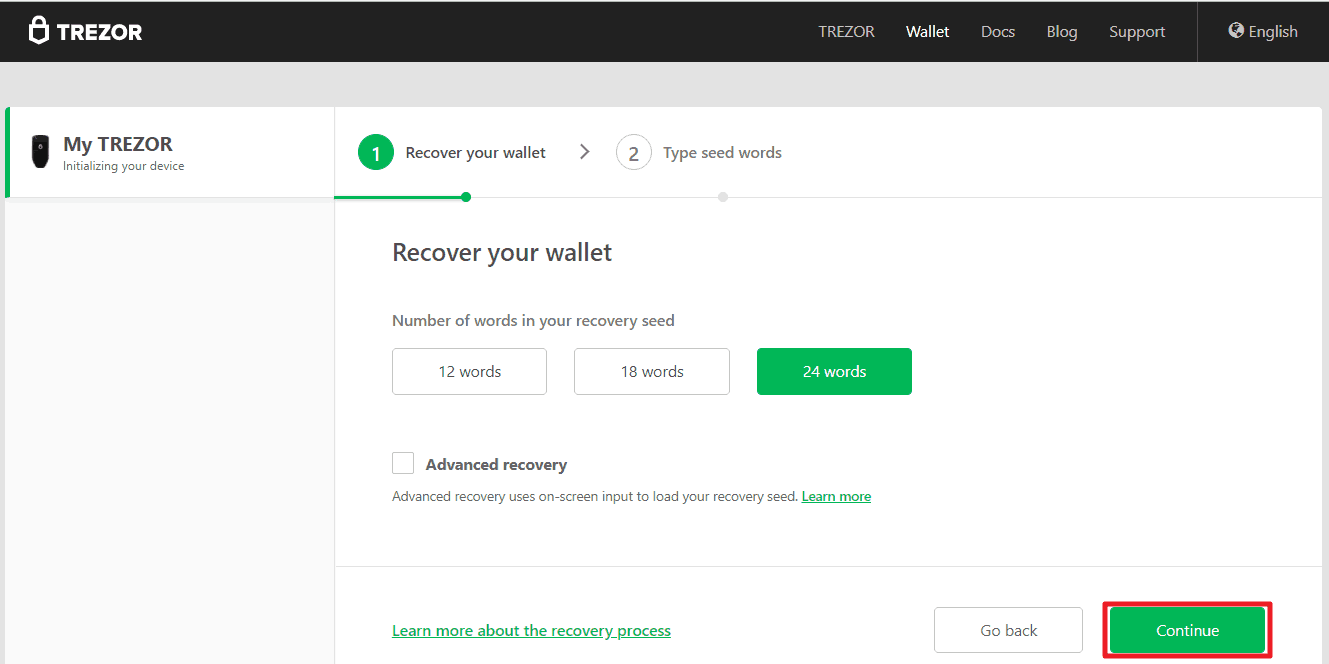
- Select 'Recover wallet'.
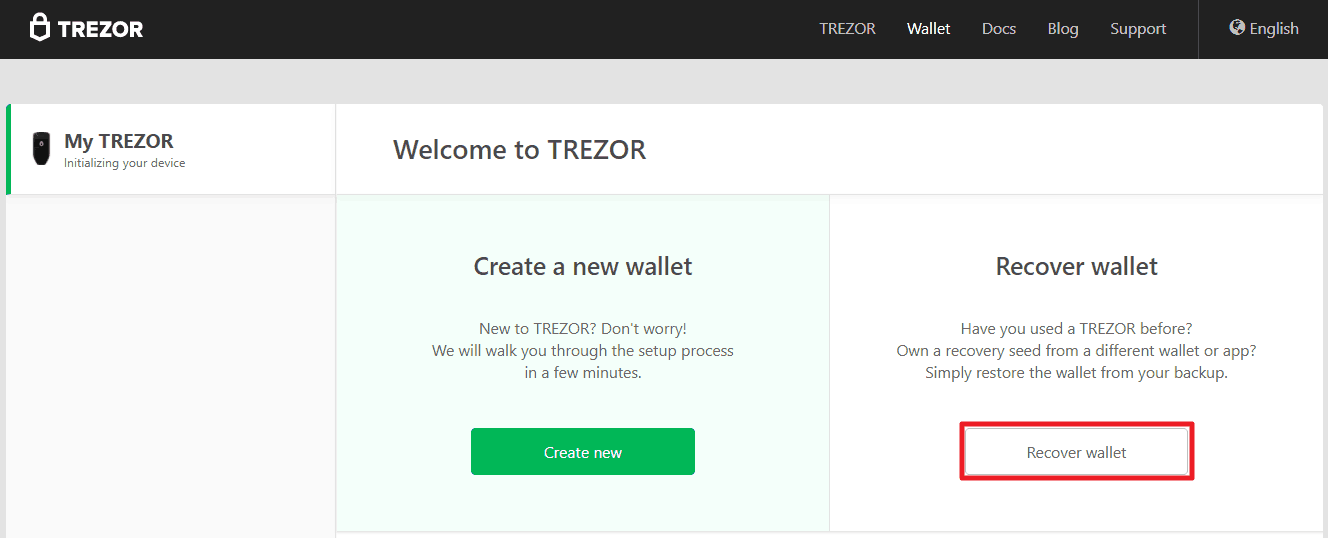
- Ensure the length of the recovery seed is selected to '24 words' and select 'Continue'.
- On the device press the right button to 'Confirm' the recovery.
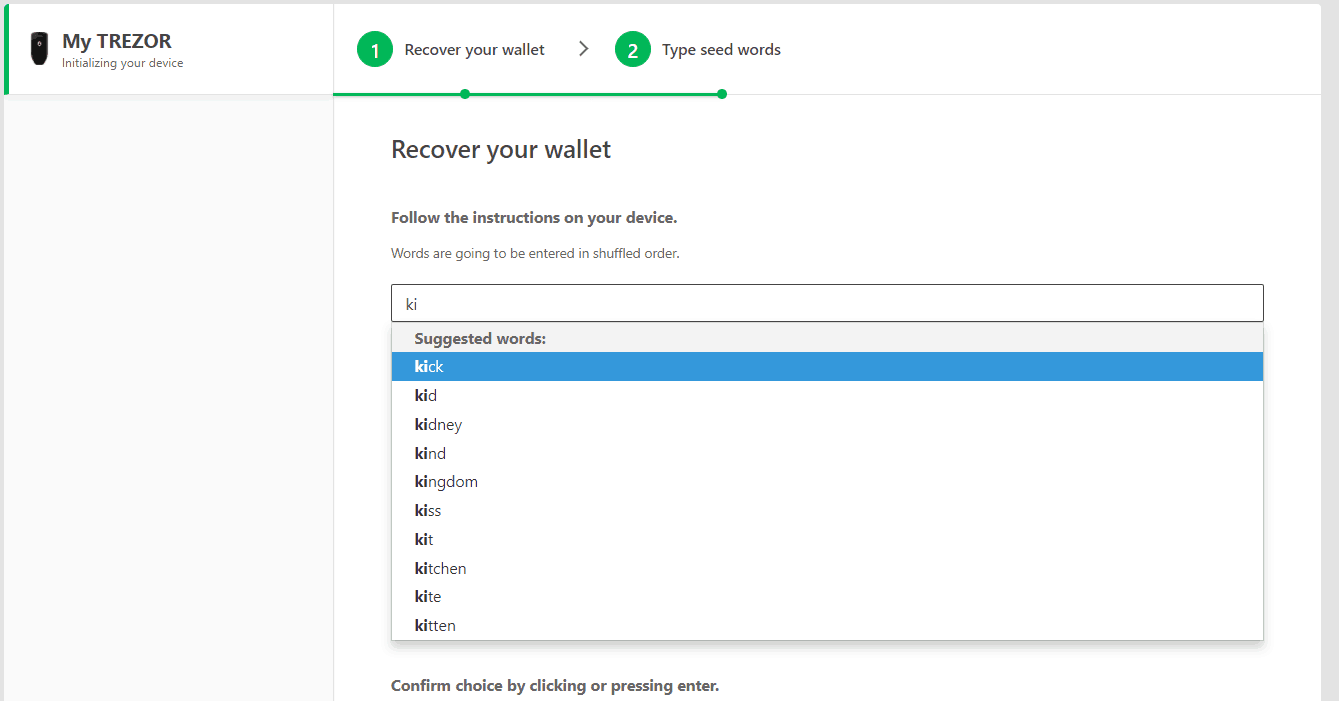
- Refer to the word number on the device (i.e. 19th word) and enter that word of the recovery sentence on the recovery card into the browser. Repeat until all words have been entered.
NOTE: The word will be auto-completed after entering 2-3 letters. Select the word from the drop-down list to continue to the next word.
- Select 'Continue to the wallet'.
- Set the name of the Trezor again by selecting .Name your TREZOR in 1 minute. then enter a name on the screen and press the right button on the device to Confirm.
- Press continue and then the right button on the device to confirm setting a PIN for the device. Choose a PIN for the device (6+ digits recommended); this is done by looking at the screen on the device that shows numbers in a randomized order and then clicking the position of the number in the browser.
- Re-enter the PIN to confirm the value, noting that the placement of the numbers on the device will have changed.
- Select 'Continue' and then if desired follow Trezor on Medium or Twitter to keep up to date with news related to the wallet, such as software updates.
* This link directs you to Amazon as it provides the most options for purchasing this wallet. However, it is important to note that when purchasing a hardware wallet through a third party retailer or vendor to always ensure that the wallet once received has not been tampered with as this could compromise its security and thus the cryptocurrency you will store on it. Each wallet manufacturer typically has tamper resistant packaging or other hardware/software mechanisms to prevent tampering but they are not foolproof. Please only purchase hardware wallets from trusted vendors.
Users should be aware that if they click on a cryptocurrency link and sign up for a product or service, we will be paid a referral fee. This in no way affects our recommendations, which products we choose to review or our advice which is the sole opinion of the authors.
The opinions provided in this article are those of the author and do not constitute investment advice. Readers should assume that the author and/or employees of Grizzle hold positions in the company or companies mentioned in the article. For more information, please see our Content Disclaimer.

