LEDGER NANO S – WALLET REVIEW & USER GUIDE
One of the leaders in this category, the Ledger Nano S is a hardware wallet for both beginners and advanced users with support for a broad range of crypto assets
The Ledger Nano S hardware wallet supports a broad range of crypto assets in a small, well-built package that provides all the features needed for both novice and experienced users. The Nano costs $98 USD (€79 with free shipping currently), which is lower than most wallets reviewed and given the broad range of crypto asset support and ease of use, the device provides excellent value for both beginner and advanced users.
Features
- Multi-Apps for each crypto asset or other application
- Built in display for confirmations
- PIN code access control
- Universal 2 factor device (FIDO U2F)
LEDGER NANO S REVIEW
Pros
- Small, portable design with solid build
- Support for many crypto assets and other integrations
- Easy-to-use applications with advanced options as needed
Cons
- Small screen can make confirming transaction information difficult
- Separate apps for each crypto asset
- Cable needed to connect (otherwise portable device)
* This link directs you to Amazon as it provides the most options for purchasing this wallet. However, it is important to note that when purchasing a hardware wallet through a third party retailer or vendor to always ensure that the wallet once received has not been tampered with as this could compromise its security and thus the cryptocurrency you will store on it. Each wallet manufacturer typically has tamper resistant packaging or other hardware/software mechanisms to prevent tampering but they are not foolproof. Please only purchase hardware wallets from trusted vendors.
BUILD QUALITY & DURABILITY
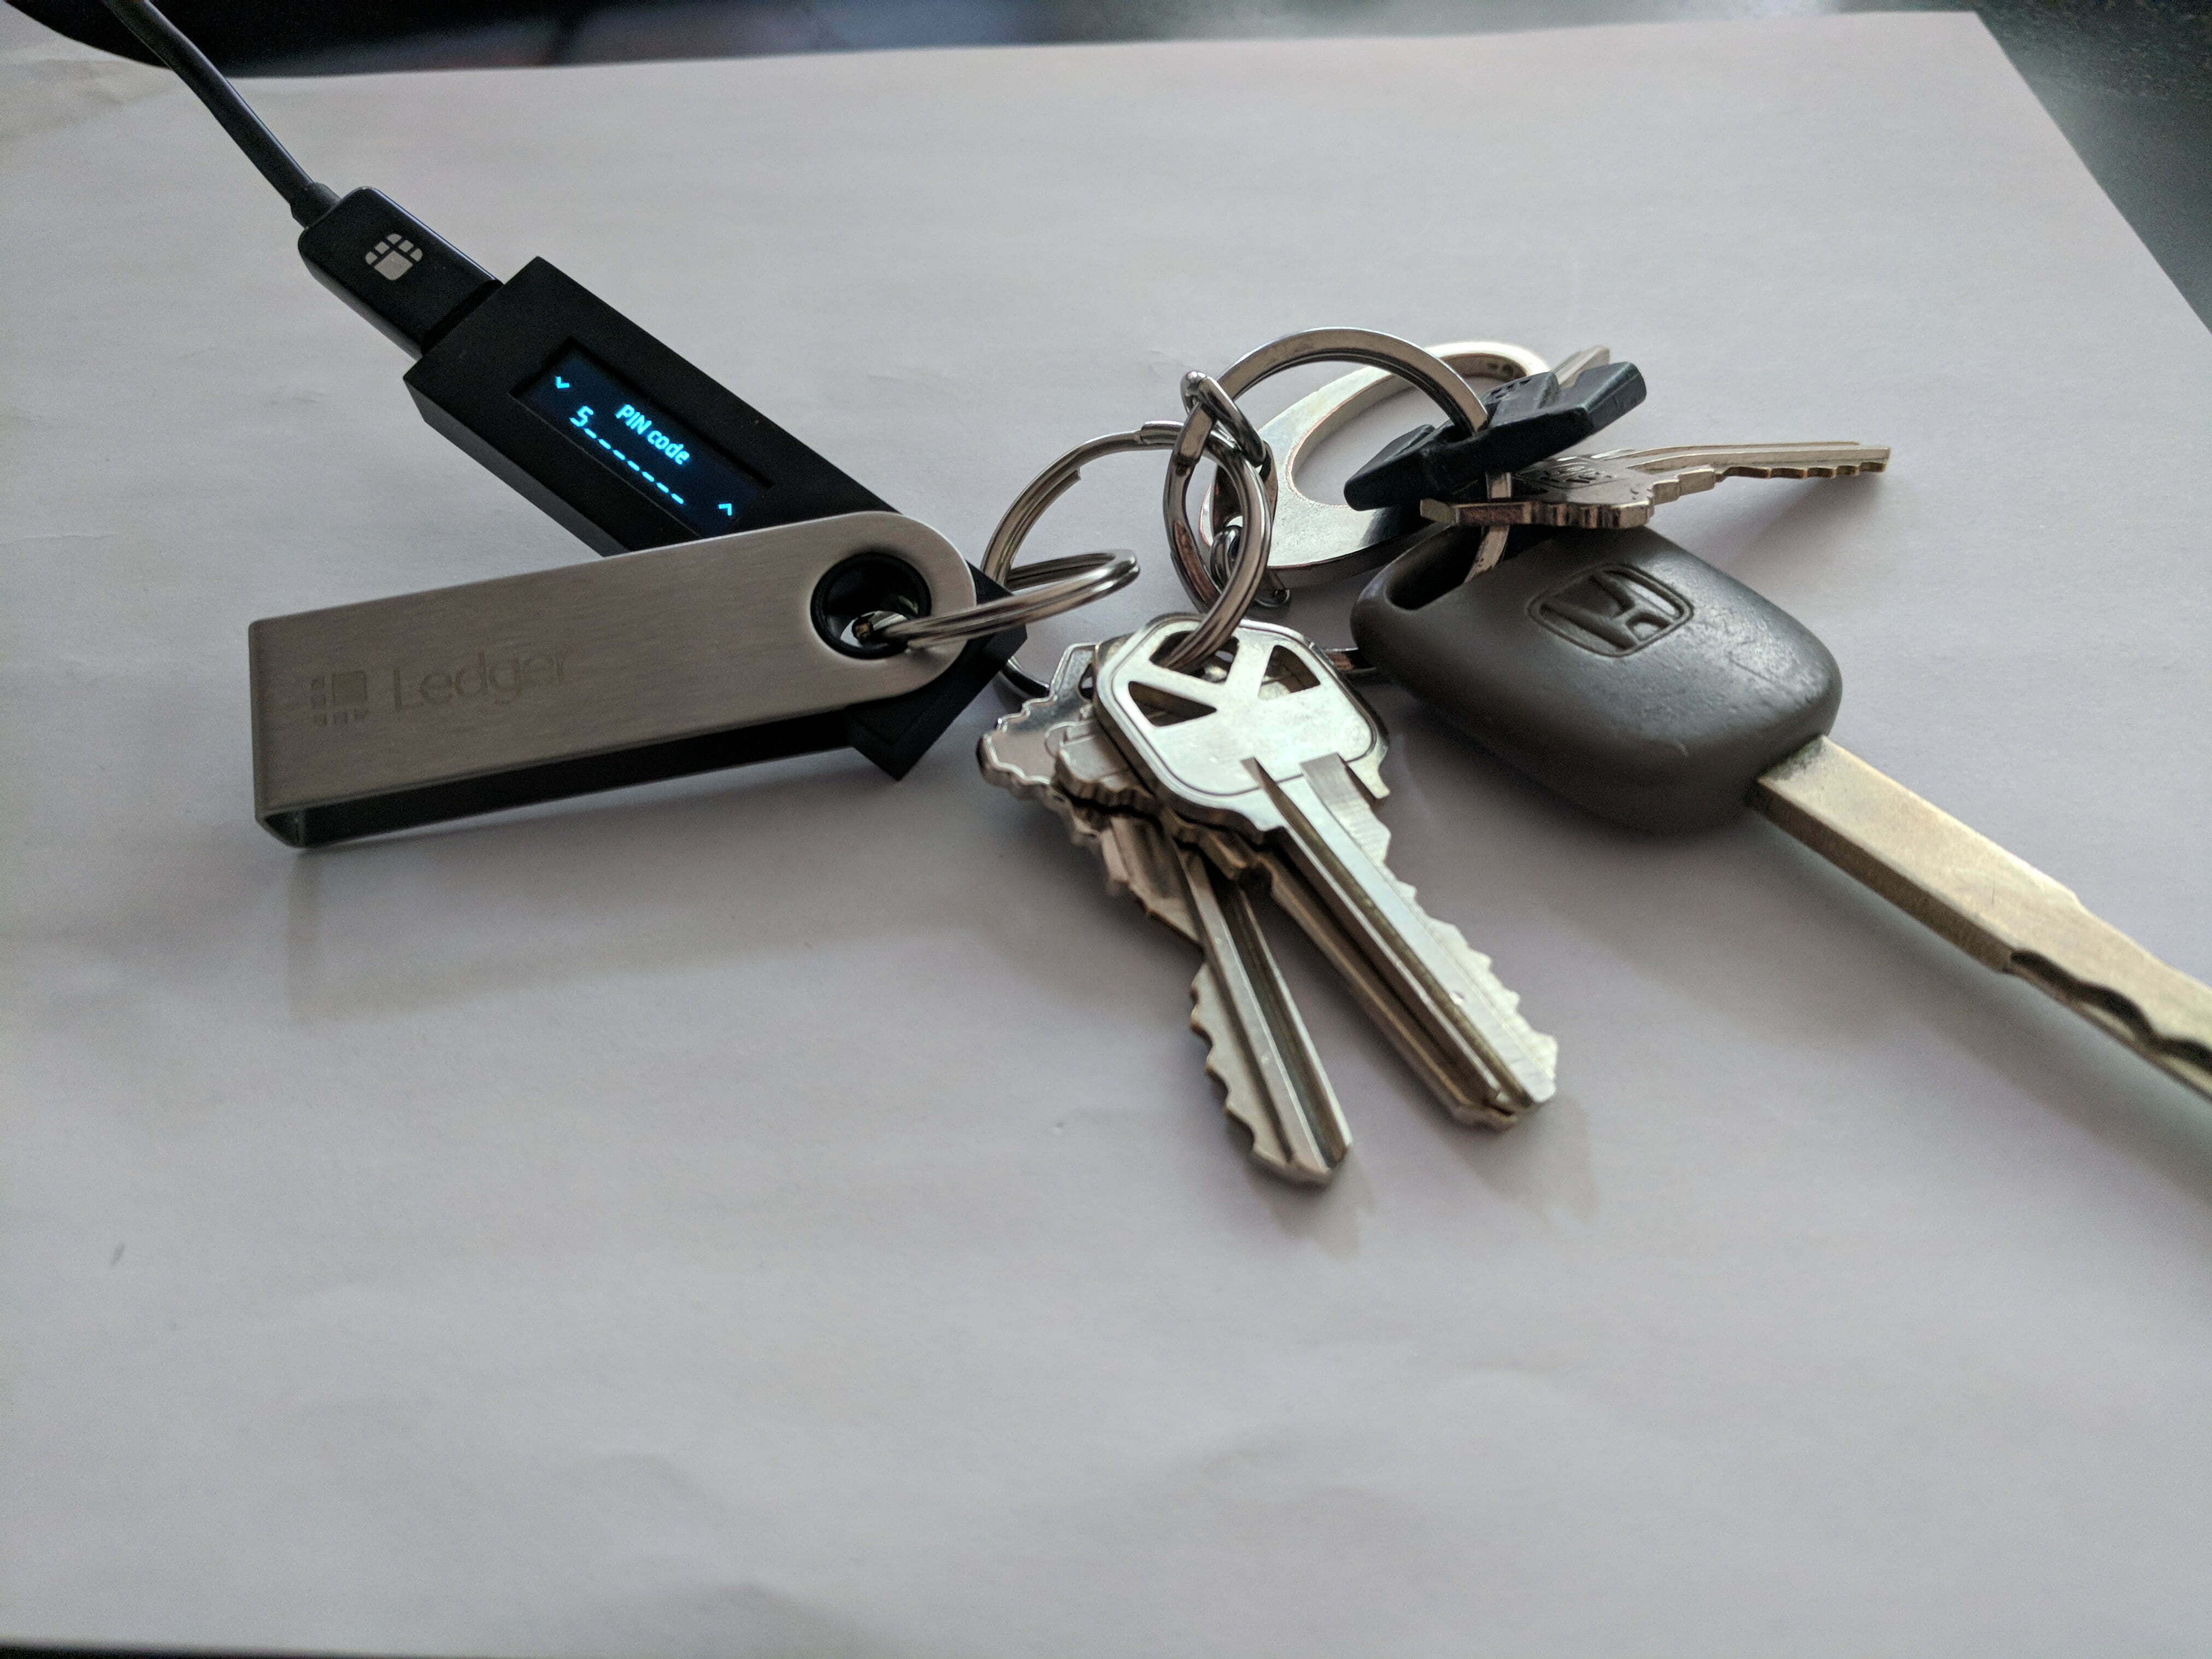
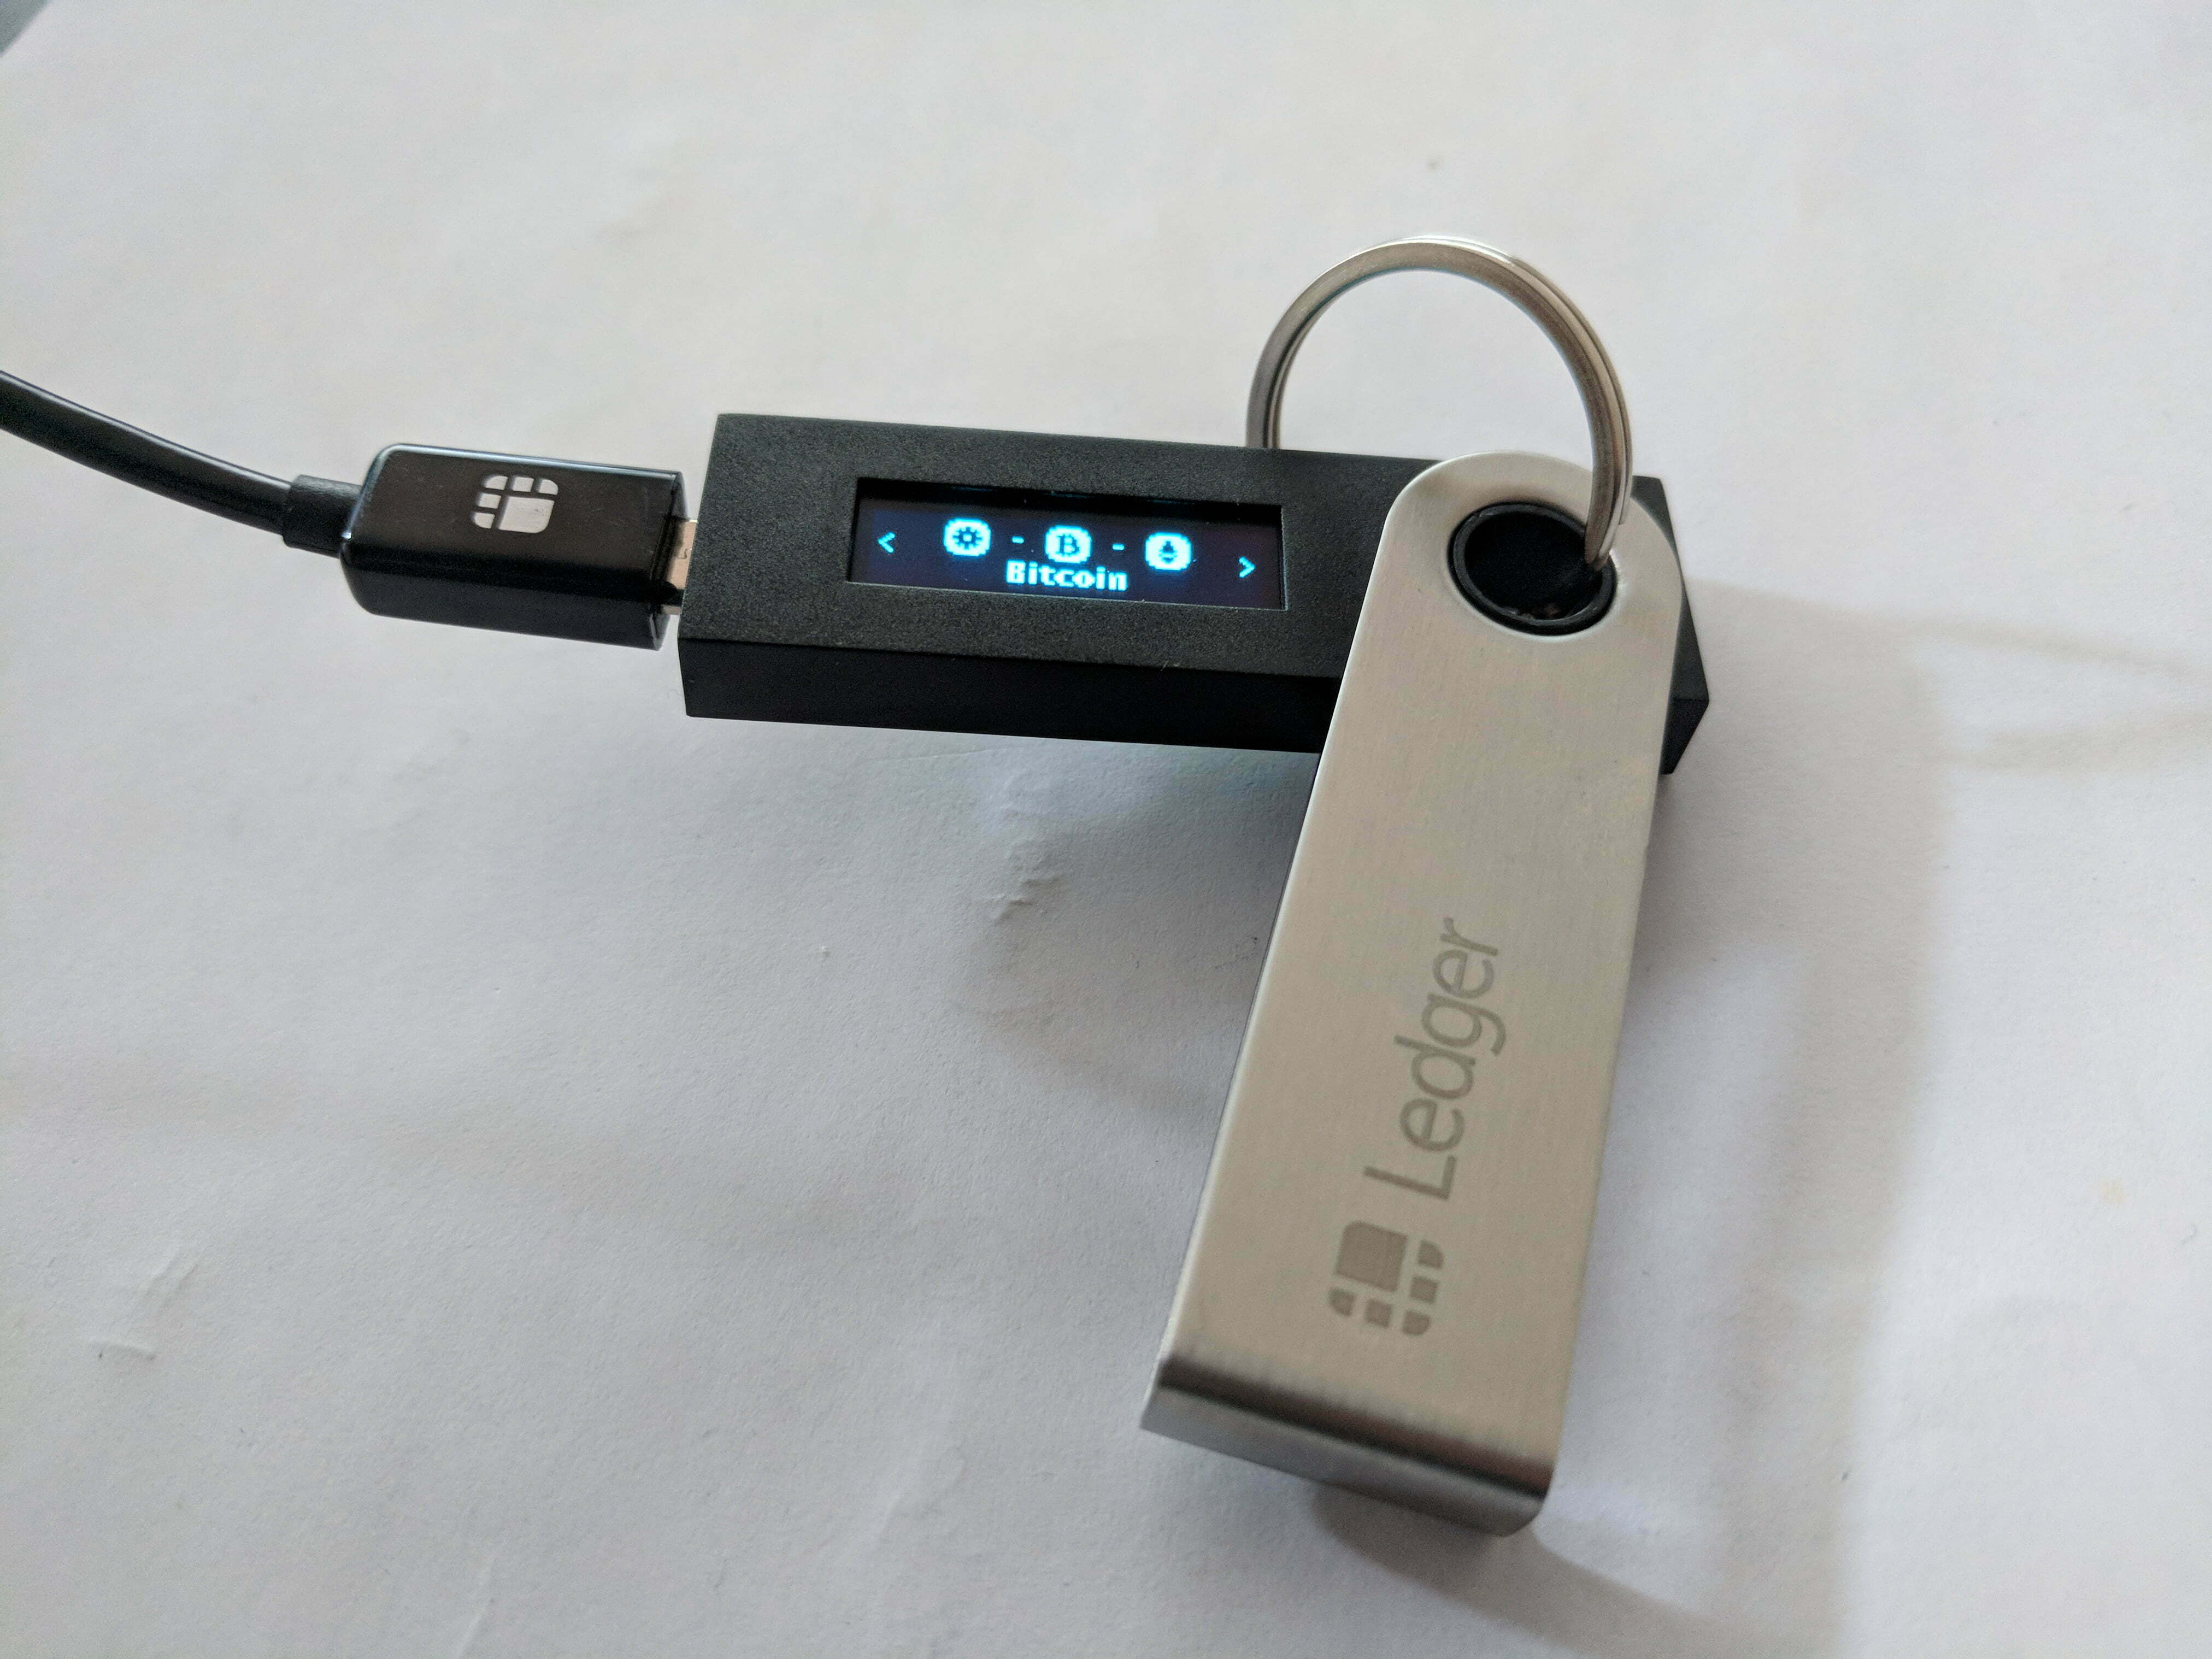
The Ledger Nano S is a solidly built, compact device with materials that provide the right balance of polish and discretion, allowing the unit to pass as a simple USB key. The brushed stainless steel cover protects the internal device and the screen is easily opened or closed, which makes carrying the Nano S on a keychain a stress-free experience.
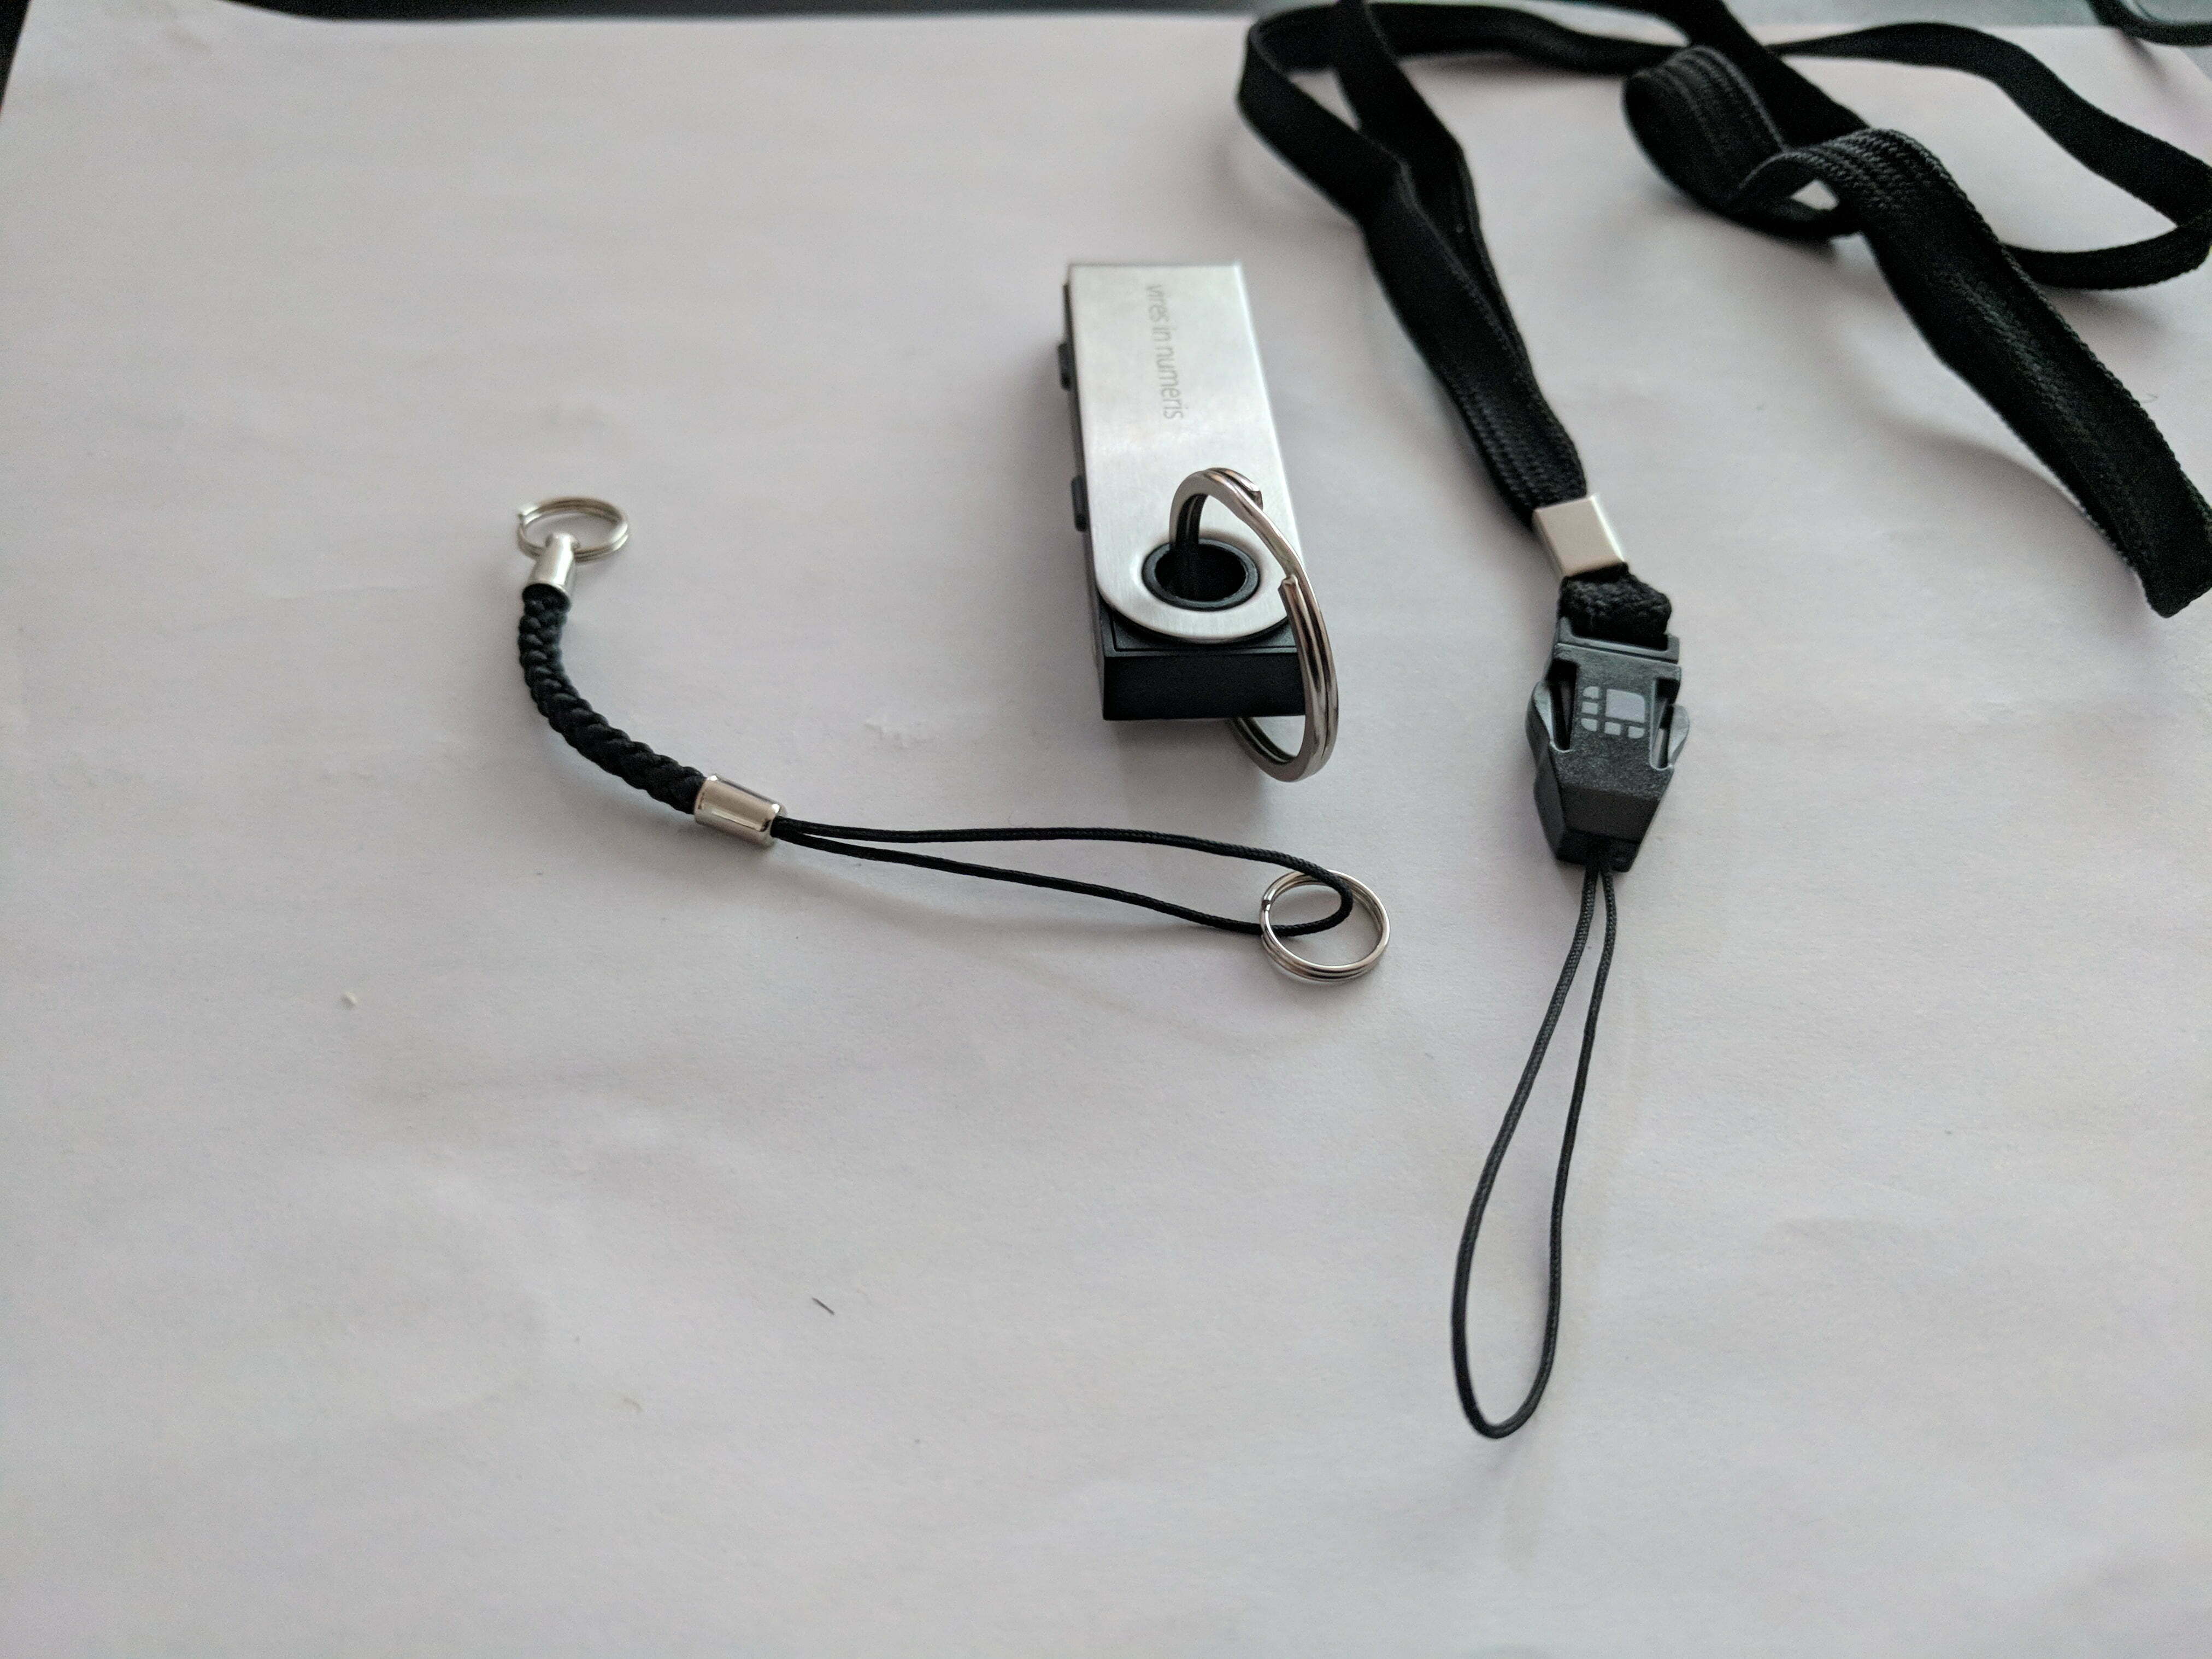
The Nano S also comes complete with accessories for portability, including a key ring, a lanyard and a shorter attachment string that feels less sturdy and has been known to break.
There's a dearth of information about how to attach these accessories to the device but it would be recommended to attach the key ring attachment if desired to carry on a keychain. Then only if needed attach either the lanyard or shorter string so that none interfere with opening/closing the cover of the device.
The portability of the device is marred only by the need for a USB cable to connect the device to a computer that makes using the Nano S slightly less flexible than a device which could be plugged directly into a USB slot.
SETUP PROCESS
Setting up the Ledger Nano S was straightforward and simple. Following the descriptive prompts on the screen helped familiarize users with the interface and how to use the buttons to navigate.
Through the setup process the user can also create a backup of the device and a confirmation process helps to ensure that the backup is correct. Also, Ledger provides good information and links on how to install and use the different apps (Manager, Bitcoin, Ethereum and Ripple).
TIP: Some anti-virus programs, such as BitDefender may block the Ripple desktop application, to add an exception follow the instructions here.
EASE OF USE & SECURITY
The Nano S offers a good balance between ease of use and more advanced features to control transaction details.
The one aspect of using the device which is slightly difficult was using the small screen to confirm transaction details when sending coins due to the sender's address needing to scroll across the small screen.
Otherwise, both sending and receiving coins was quick and easy using the applications provided.
The Nano S has recently received some criticism for having security flaws exposed. The most recent being identified publicly in March 2018 which identified a potential attack where the device could have been compromised prior to purchase.
However, it's important to note that this flaw was known by the company prior to the announcement and was corrected by a firmware update also made available before the announcement.
Threats like the one identified above are sometimes found in devices which help provide users security over their crypto assets, but how and how quickly companies are able to respond to these threats indicate how much risk the user faces.
In cases thus far Ledger has been quite quick to respond and provide information to users on how to avoid or correct for potential attacks on crypto assets stored in their devices. It's always recommended to keep applications and firmware of devices up to date.
SUPPORTED COINS
The Nano S provides support for 25 coins/tokens, which is one of the best offerings in the hardware wallet category. The coins supported include (full list here):
- Litecoin (LTC)
- Dash (DASH)
- Dogecoin (DOGE)
- NEO (NEO)
- Stellar (XLM)
In addition, the Nano S also offers integrations with web services and mobile applications which adds even more functionality.
In terms of coin support, the integration with MyEtherWallet allows the Nano S to also be used to store ERC20 tokens which are widely used for ICOs (Initial Coin Offerings).
HELP & CUSTOMER SUPPORT
Ledger provides a wealth of support materials for the Nano S on their site. An excellent search function helps users quickly find answers to many questions regarding use of the device as well as information regarding using the applications and different integrations. In addition, for users getting started with the device, Ledger provides a good set of instructional videos here.
With respect to customer support, a support request about an integration shown on the Ledger website was sent using the contact form found here.
The request received an automated response quickly indicating that a ticket had been created and a response to the request was received 3 weeks later, but it did not provide an adequate answer to the original question.
A follow-up has been sent and a response from Ledger was received but the issue is still under investigation as of the time of writing of this post.
TOTAL SCORE
The Ledger Nano S has all the functions and useability needed for any level of crypto investor to store private keys across a wide range of crypto assets.
The small design is well suited to attaching to a keychain for portability and the metal cover protects the important parts of the device, although the small screen can be challenging to read at times.
With support for 25 coins/tokens along with 7 integrations with other platforms that adds functionality, including the ability to store ICO tokens (ERC20) for crypto assets and two-factor authentication, the Nano S is packed with all the capabilities most users will need.
The Ledger Nano S costs $98 USD (€79 with free shipping currently), which is one of the lowest prices among the wallets reviewed and given the broad range of crypto asset support and ease of use, the device provides excellent value for both beginner and advanced users.
* This link directs you to Amazon as it provides the most options for purchasing this wallet. However, it is important to note that when purchasing a hardware wallet through a third party retailer or vendor to always ensure that the wallet once received has not been tampered with as this could compromise its security and thus the cryptocurrency you will store on it. Each wallet manufacturer typically has tamper resistant packaging or other hardware/software mechanisms to prevent tampering but they are not foolproof. Please only purchase hardware wallets from trusted vendors.
LEDGER NANO S – USER GUIDE
Find out how to use Ledger Nano S with step-by-step directions on transferring crypto as well as how to backup and recover
1. SETTING UP DEVICE
The process for setting up the Ledger Nano S was straightforward and started with going to the start page. A video of the configuration steps is also available here. The following steps help guide the user through configuring the device:
- Connect the Ledger Nano S to a USB port using the provided cable.
- Follow the prompts on the screen device and press both buttons at the same time when ready to proceed.
- Press the right button over the checkmark when asked to 'Configure as new device?'.
- When prompted to .Choose your PIN code. press both buttons at the same time and then select the PIN by using the right and left buttons to set a number and both buttons to confirm the number.
- Repeat the process to confirm the PIN.
- When prompted to 'Write down your recovery phrase' get the Recovery Sheet card provided with the device and a pen then select both buttons to proceed.
- Carefully write down all 24 words onto the recovery sheet by using the right and left buttons to scroll through the words.
- Double and triple check each word in the recovery sentence being sure to check spelling as this is the only means to recover wallets on the device if it's lost or stolen.
- Press both buttons at the same time to proceed to confirm several of the recovery words/
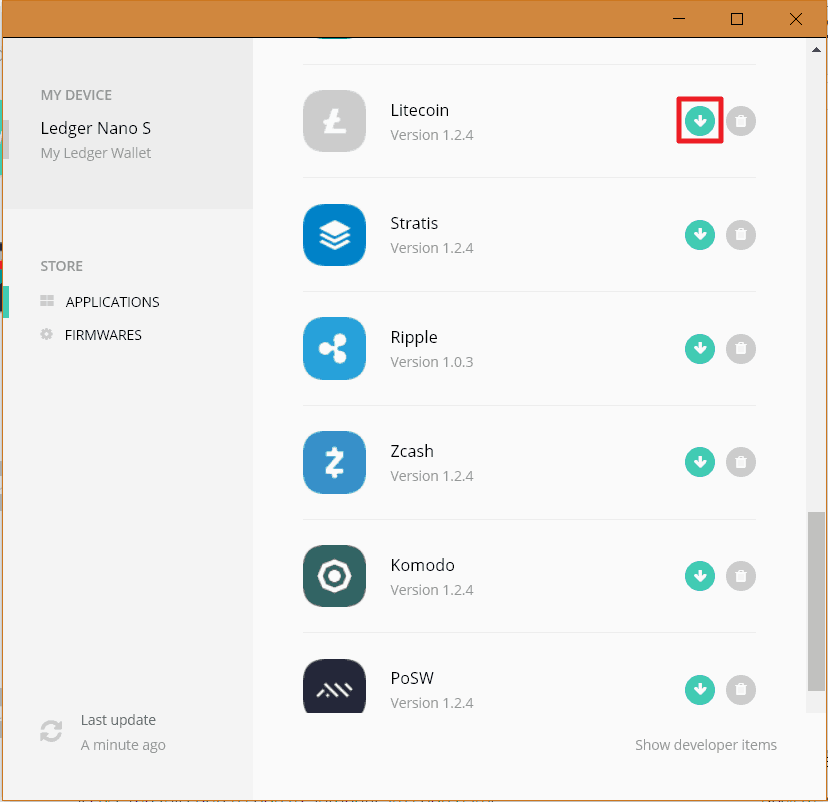
- Open a Chrome or Chromium web browser and go here and select 'Install' to install the Ledger Manger app, which will allow the installation of apps for different crypto assets onto the device as well as update the firmware when needed.
- Open the newly installed Ledger Manager app and choose the apps to install on the device by selecting the download icon next to each. Note for each app installed the user will have to confirm the installation on the device by pressing the right button (over the checkmark).
- Go here and select to install the Ledger Wallet Bitcoin Chrome application, which is used to view Bitcoin and altcoin wallets.
- OPTIONAL: If it's desired to use the Ledger Nano S for Ethereum there's a separate Chrome wallet application that can be downloaded and installed here. If wanting to use the Ledger Nano S for Ripple there's a separate desktop application that can be downloaded and installed here.
2. RECEIVING COINS
Receiving Bitcoin
To receive bitcoin with the Nano S follow these steps:
- Plug the Nano S into a USB port and unlock it by entering the PIN code.
- Select the Bitcoin app on the device.
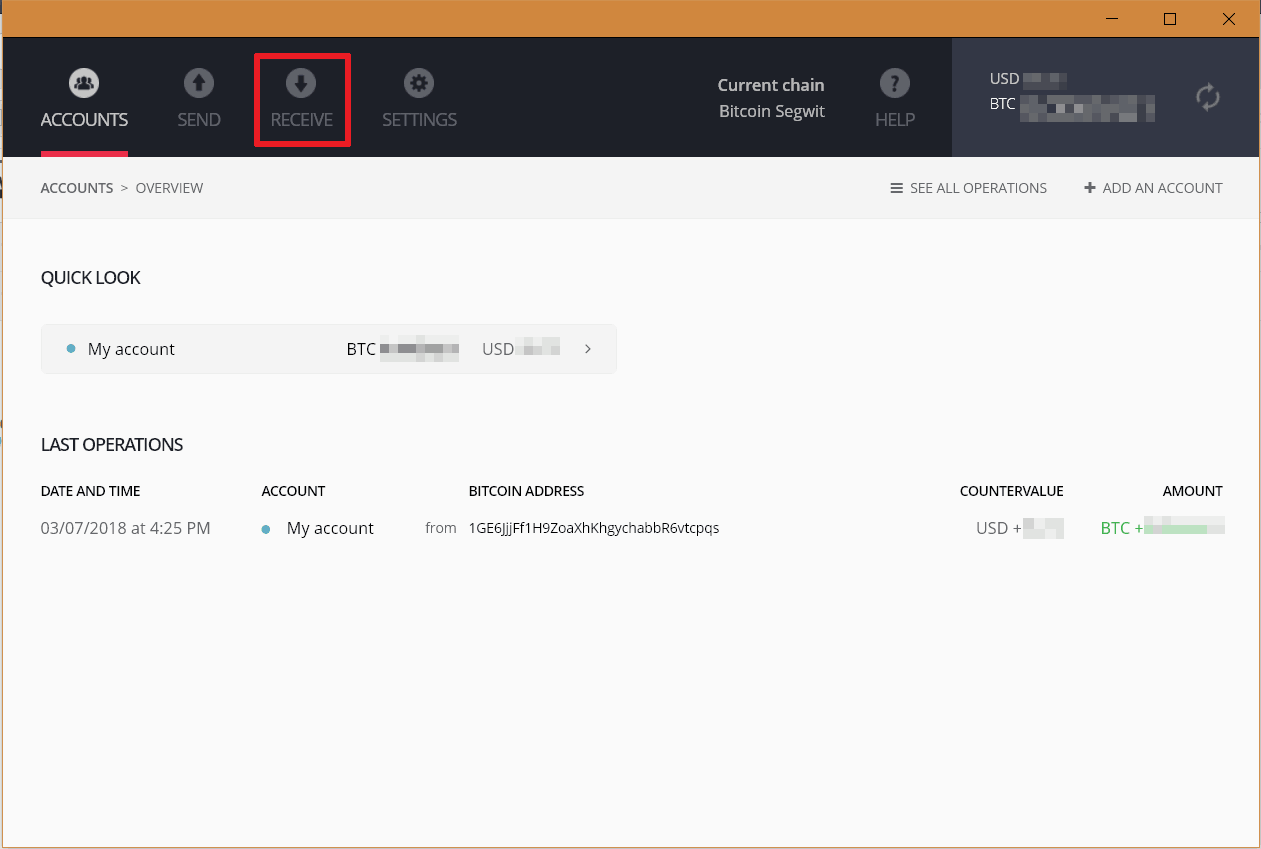
- Open the Bitcoin chrome extension on a computer and select 'Receive'.
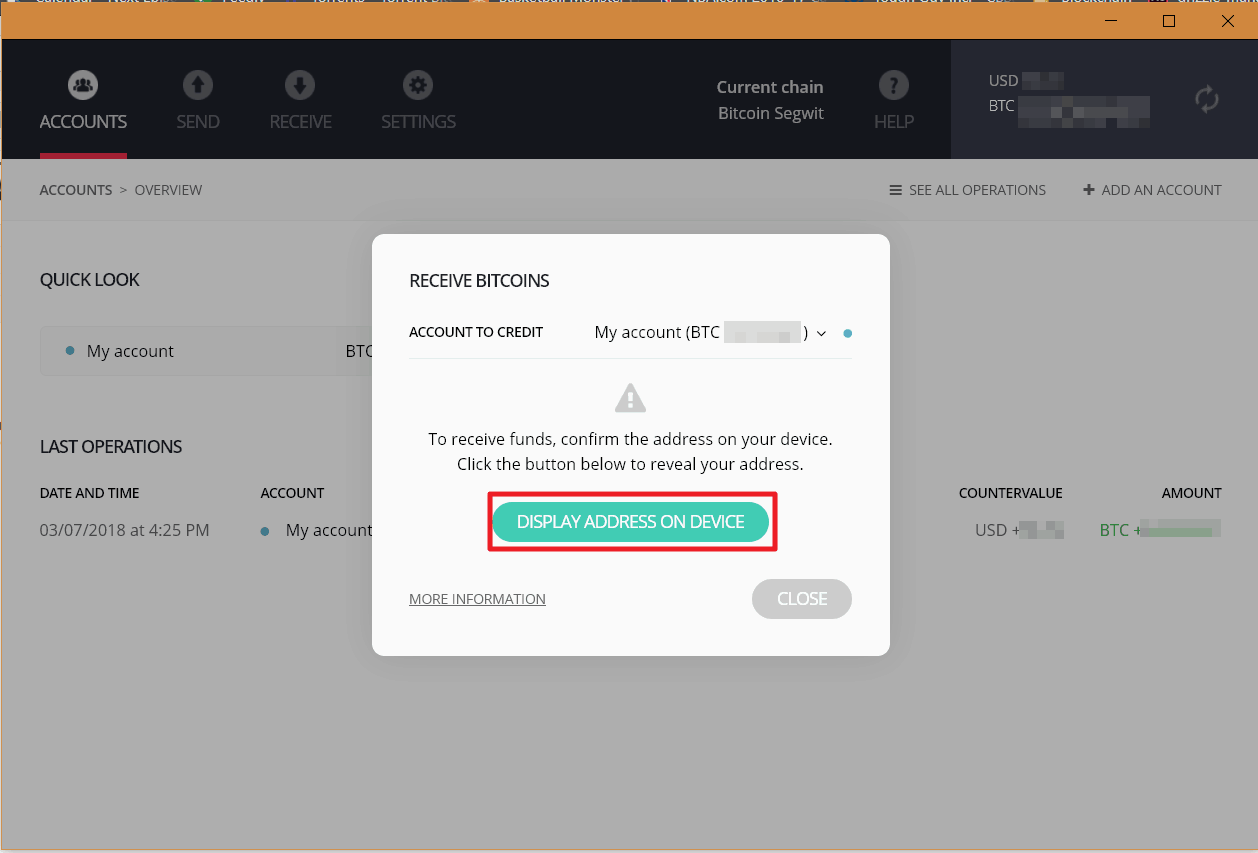
- Choose the Account to receive the bitcoin and select 'Display Address on Device'.
- Review the address shown in the application with that shown on the device. If they match, copy the address or capture the QR code and provide that to the sender.
- Select the right button on the device to confirm the address.
- Once the BTC has been sent, the transaction information can be seen in the desktop application (press the refresh button in the top-right corner to refresh account).
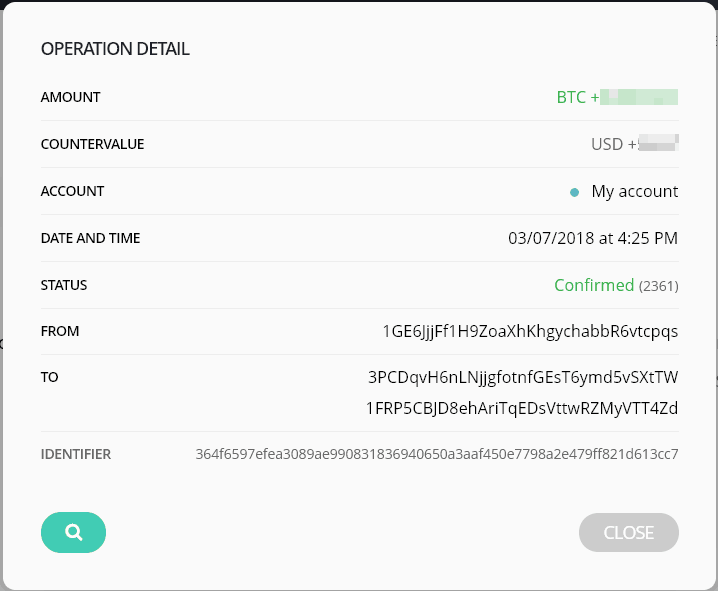
- Clicking on an operation will provide more details and selecting the magnifying glass icon in the operation detail screen will open the details of the transaction in the block explorer.
- It's recommended that the details be checked to ensure the 'Status' is 'Confirmed' with more than 6 confirmations which may take about an hour from the time the bitcoin was sent.
Receiving Ethereum
To receive Ethereum with the Nano S follow these steps:
- Plug the Nano S into a USB port and unlock it by entering the PIN code.
- Select the Ethereum app on the device.
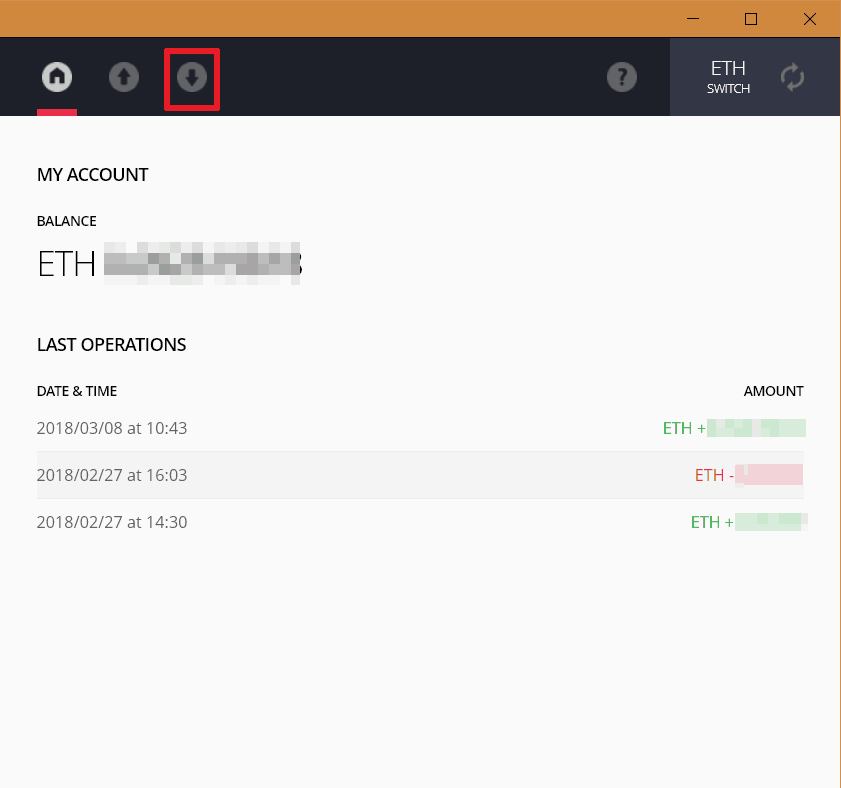
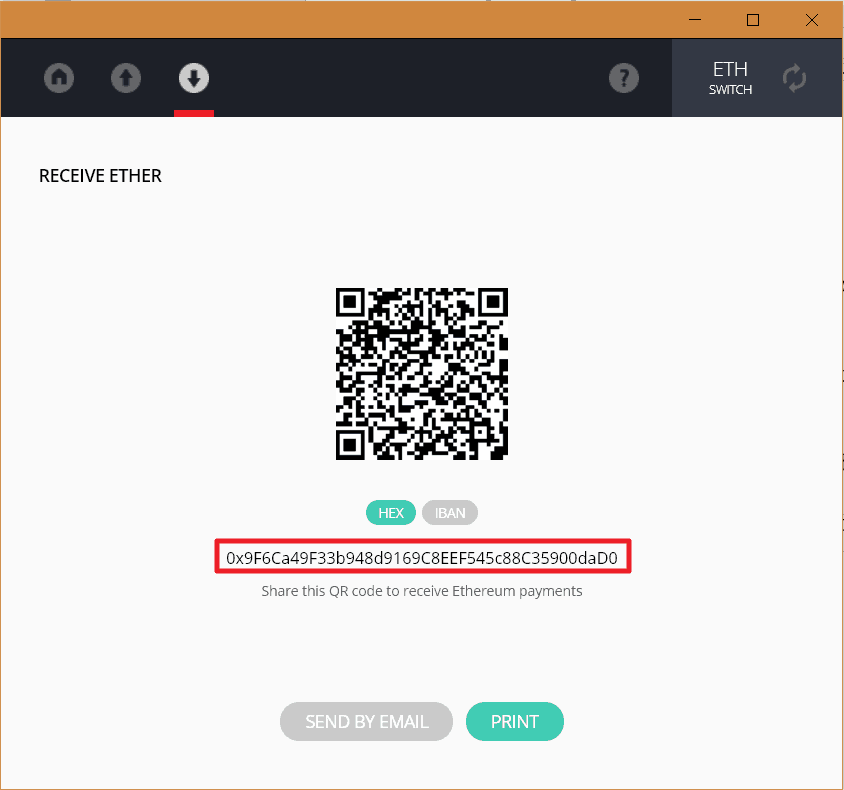
- Open the Ethereum Chrome extension on a computer and select the downward arrow from the icons at the top.
- Copy the address or capture the QR code and provide that to the sender.
- Once the Ethereum has been sent, the transaction information can be seen from the Home button on the desktop application (press the refresh button in the top right corner to refresh account).
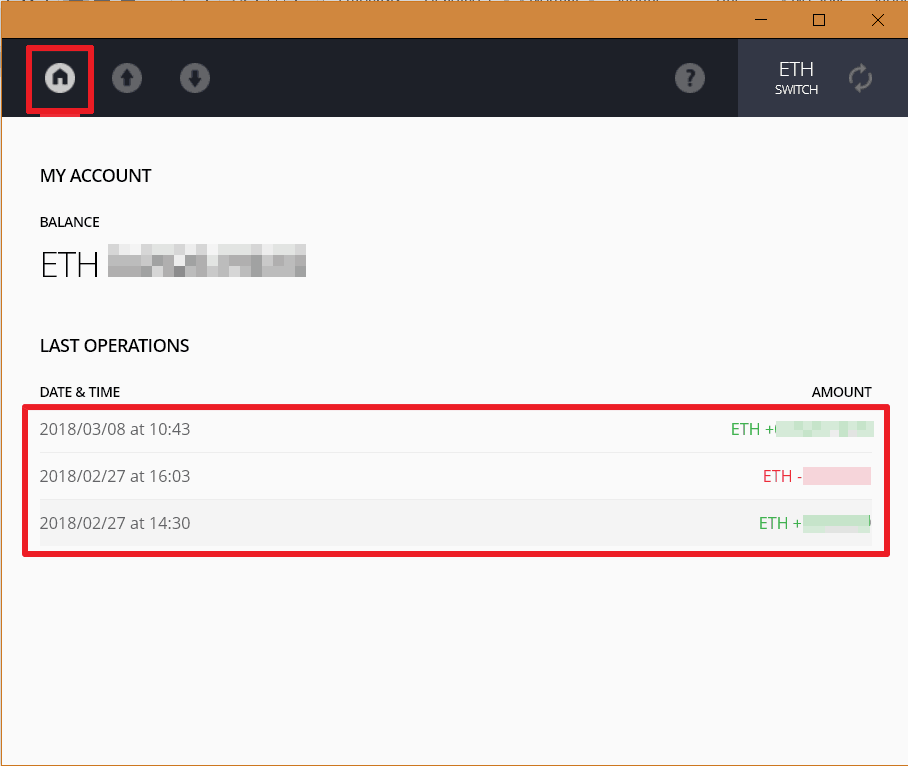
- Clicking on an operation will open up the details of the transaction in the block explorer.
3. SENDING COINS
Sending Bitcoin
To send Bitcoin with the Nano S follow these steps:
- Plug the Nano S into a USB port and unlock it by entering the PIN code.
- Select the Bitcoin app on the device.
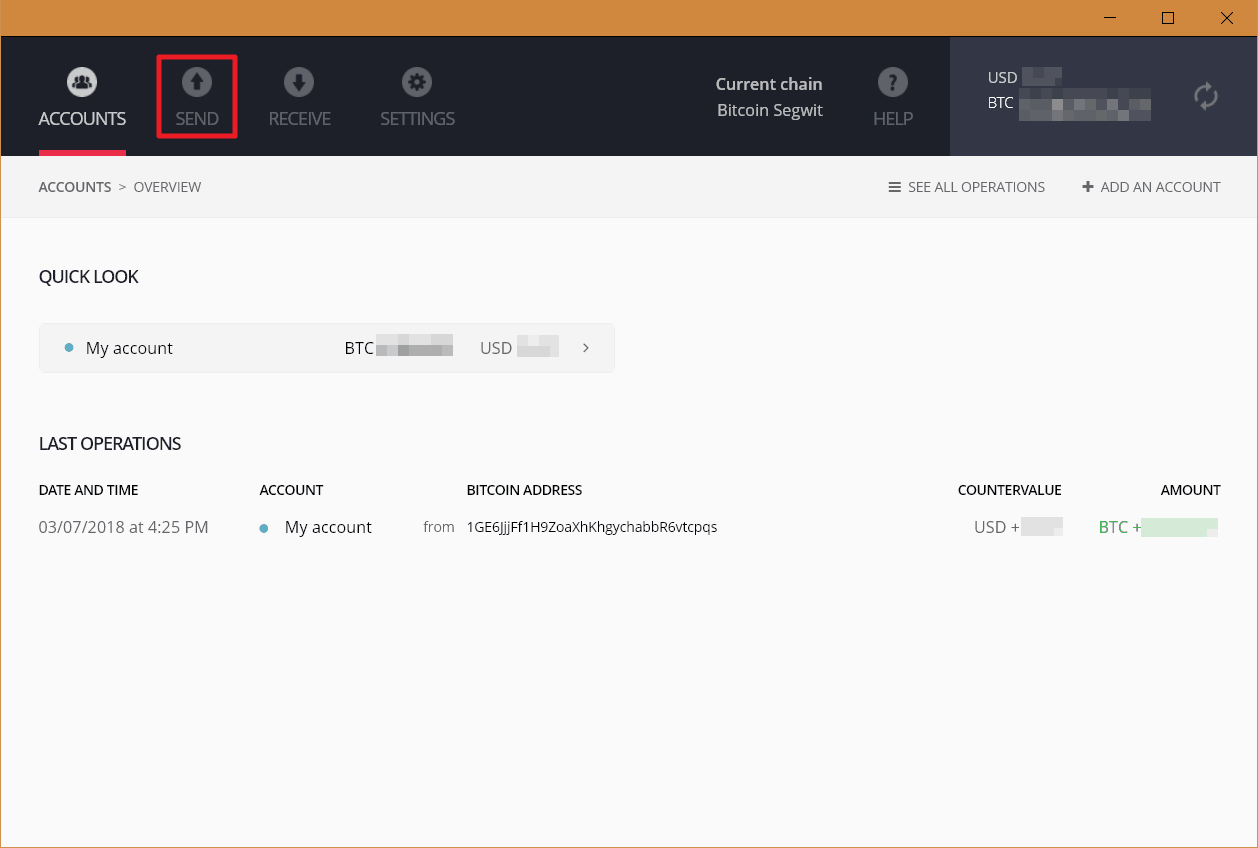
- Open the Bitcoin Chrome extension on a computer and select 'Send'.
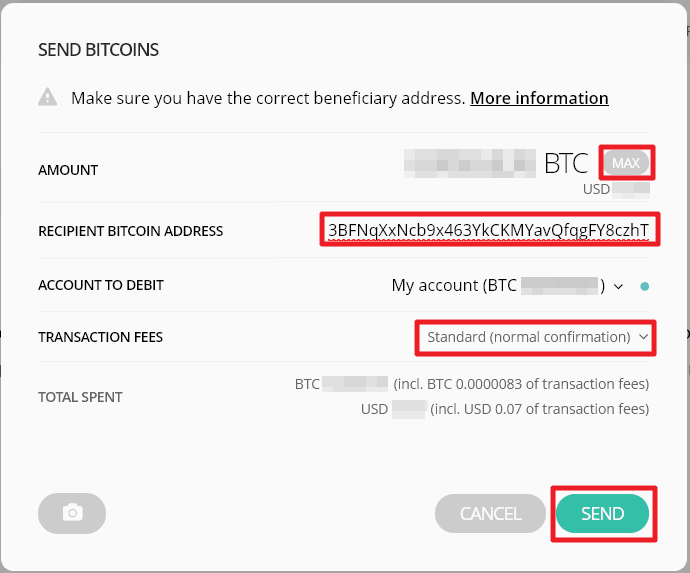
- Enter in the Amount of BTC to send or press 'Max' to send all the bitcoin in the account minus transaction fee and enter in the recipients Bitcoin Address then press 'Send'.
NOTE: There's an option to adjust the transaction fees by using the drop-down but it should be noted that lower transaction fees will likely result in a slower confirmation time for the transaction whereas higher transaction fees can expedite the transaction. It's recommended that the 'Standard' fees be used in most cases.
- The desktop application will ask to confirm the transaction on the device. Review the amount to send and the recipients address on the device and if they are correct press the right button over top of the checkmark to confirm.
- Select the 'Home' button, then use the Refresh button in the top-right corner to view the updated balance in the account and the last operation.
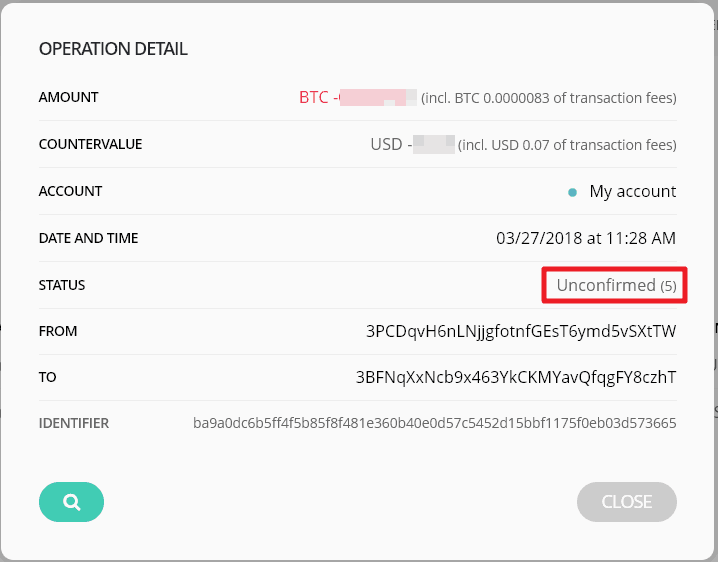
- To view the details of the transaction click on the operation. Selecting the magnifying glass icon in the operation detail screen will open the details of the transaction in the block explorer.
- The transaction will initially be marked as 'unconfirmed' which will be the case until there have been 6 confirmations of the transaction on the blockchain, which typically takes about 1 hour.
Sending Ethereum
To send Ethereum with the Nano S follow these steps:
- Plug the Nano S into a USB port and unlock it by entering the PIN code.
- Select the Ethereum app on the device.
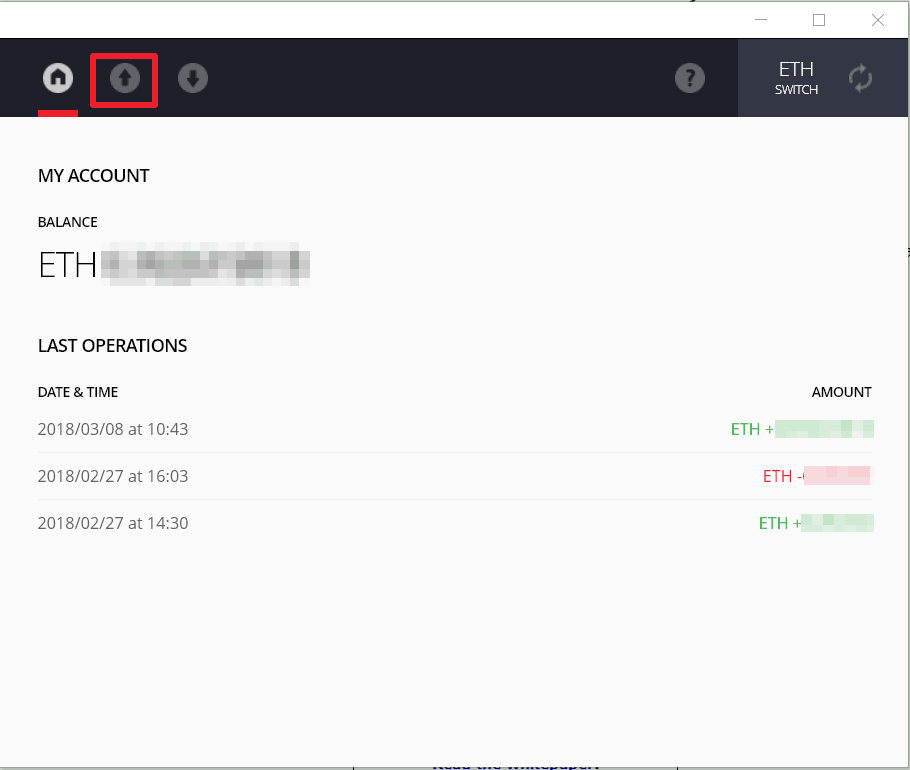
- Open the Ethereum Chrome extension on a computer and select the upward arrow from the icons at the top.
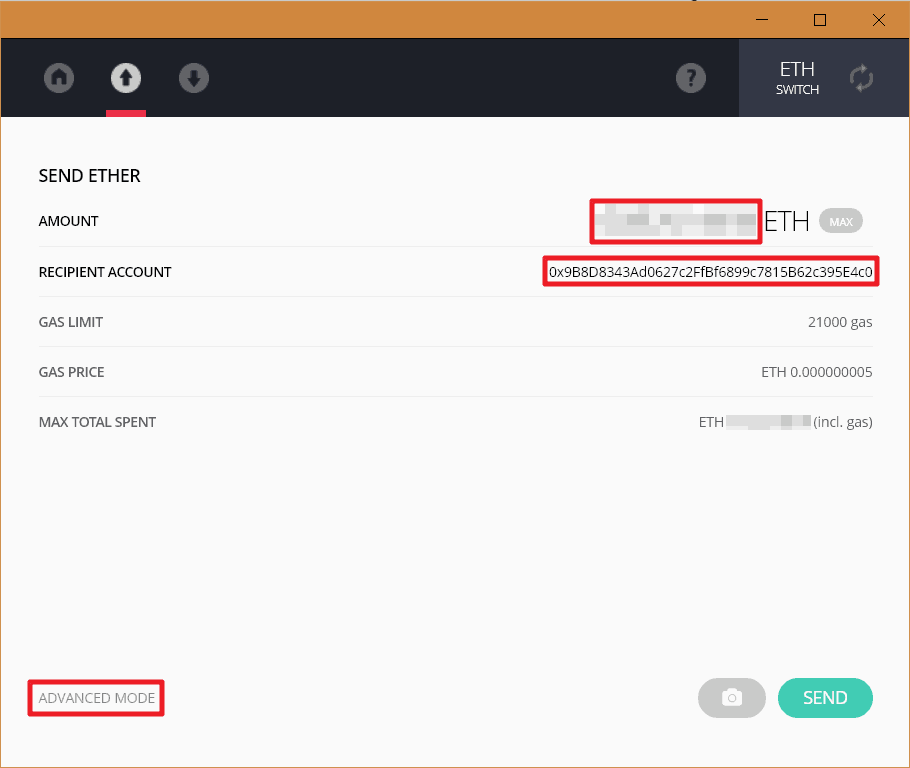
- Enter in the Amount of ETH to send or press 'Max' to send all the Ethereum in the account minus transaction fee and enter in the recipients Ethereum Address then press 'Send'.
NOTE: There are additional options available to change the gas limit (# of transactions able to be performed), gas price (price per transaction) and add contract data (for investing in ICOs) by pressing 'Advanced Mode' in the bottom left.
- The desktop application will ask to confirm the transaction on the device. Review the amount to send and the recipient's address on the device and if they are correct press the right button over top of the checkmark to confirm.
- Select the 'Home' button, then use the Refresh button in the top-right corner to view the updated balance in the account and the last operation.

- Clicking on an operation will open up the details of the transaction in the block explorer.
4. BACKUP & RECOVERY
The backup of the Nano S is performed at the time of setup and is stored on the recovery sentence card. This card should be kept in a private, secure location, separate from the Nano S itself.
Restoring the Nano S is done from the recovery sentence card. To recover the wallet on a new or wiped Nano S:
- Plug the new or wiped Nano S into a USB port.
- Follow the prompts on the device by pressing both buttons to proceed until 'Configure as new device?' prompt is shown, then select the left button above the ‘x’.
- The device will ask to confirm to restore configuration, select the right button above the checkmark to proceed.
- Choose a PIN code by using the buttons to select the numbers for the PIN.
- Confirm the PIN code.
- Enter the recovery phrase by following the prompts and selecting 24 words then entering the first letters of each word. Once 3 to 4 letters have been entered the device will autocomplete the word. Press both buttons to confirm or use the right or left button to scroll through the choices.
- Upon entering the 24th word the device will indicate it is now ready — press both buttons to proceed.
- Open the Ledger Manager application and re-install the desired applications (i.e. Bitcoin, Ethereum, etc) onto the device (see the Setup section above for more details).
* This link directs you to Amazon as it provides the most options for purchasing this wallet. However, it is important to note that when purchasing a hardware wallet through a third party retailer or vendor to always ensure that the wallet once received has not been tampered with as this could compromise its security and thus the cryptocurrency you will store on it. Each wallet manufacturer typically has tamper resistant packaging or other hardware/software mechanisms to prevent tampering but they are not foolproof. Please only purchase hardware wallets from trusted vendors.
About Author
Users should be aware that if they click on a cryptocurrency link and sign up for a product or service, we will be paid a referral fee. This in no way affects our recommendations, which products we choose to review or our advice which is the sole opinion of the authors.
The opinions provided in this article are those of the author and do not constitute investment advice. Readers should assume that the author and/or employees of Grizzle hold positions in the company or companies mentioned in the article. For more information, please see our Content Disclaimer.

